Kyocera TASKalfa 3501i 3501i/4501i/5501i Printer Driver User Guide - Page 54
Copies, Carbon Copies, Printing Carbon Copies, Collate
 |
View all Kyocera TASKalfa 3501i manuals
Add to My Manuals
Save this manual to your list of manuals |
Page 54 highlights
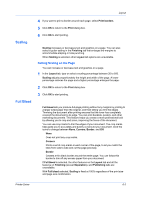
Basic Note: Source and Media type are separate items in the dialog box, but can be combined using the Combine source and media type lists setting in Device Settings > Compatibility Settings. If they are combined, Media type is unavailable on the Basic tab, and media types can be selected in the Source list. Copies This setting specifies the number of copies to print. You can print up to 999 copies. Carbon Copies This feature lets you print additional copies on paper from different trays or cassettes. This is useful for printing copies of documents such as invoices on different colored paper or media type. The maximum number of copies can be printed for each carbon copy. You can use the Prologue/Epilogue feature in the Advanced tab to add a logo or heading to each carbon copy. When Carbon copies is selected, Booklet in the Layout tab, and all the features on the Publishing tab are unavailable. Printing Carbon Copies You can print additional copies on paper from different trays or cassettes. 1 In the Basic tab, select a source and number of copies for the original copy. 2 For each carbon copy, load the desired media types or colored paper into additional paper sources. 3 Click the Carbon copies icon. 4 Click Settings. 5 In the Carbon Copy Settings dialog box, select the number of copies for each source. Collate 6 Select a Source or Media type or both for each carbon copy. 7 Click OK to return to the Print dialog box. 8 Click OK to start printing. Collate specifies the order in which the pages of a multiple copy job are printed. Click the icons to change between on and off. With On selected, the first time the print job is sent to the printing system the data is rendered as page images in the printing system's memory. The remaining job copies are printed from the stored data. This avoids the extra 5-3 User Guide
-
 1
1 -
2
-
3
-
4
-
5
-
6
-
7
-
8
-
9
-
10
-
11
-
12
-
13
-
14
-
15
-
16
-
17
-
18
-
19
-
20
-
21
-
22
-
23
-
24
-
25
-
26
-
27
-
28
-
29
-
30
-
31
-
32
-
33
-
34
-
35
-
36
-
37
-
38
-
39
-
40
-
41
-
42
-
43
-
44
-
45
-
46
-
47
-
48
-
 49
49 -
 50
50 -
 51
51 -
 52
52 -
 53
53 -
 54
54 -
 55
55 -
 56
56 -
 57
57 -
 58
58 -
 59
59 -
60
-
61
-
62
-
63
-
64
-
65
-
66
-
67
-
68
-
69
-
70
-
71
-
72
-
73
-
74
-
75
-
76
-
77
-
78
-
79
-
80
-
81
-
82
-
83
-
84
-
85
-
86
-
87
-
88
-
89
-
90
-
91
-
92
-
93
-
94
-
95
-
96
-
97
-
98
-
99
-
100
-
101
-
102
-
103
-
104
-
105
-
106
-
107
-
108
-
109
-
110
-
111
-
112
-
113
 |
 |
