Lexmark E238 Service Manual - Page 113
Service checks, Cooling fan service check
 |
View all Lexmark E238 manuals
Add to My Manuals
Save this manual to your list of manuals |
Page 113 highlights
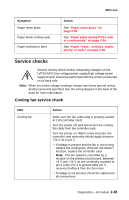
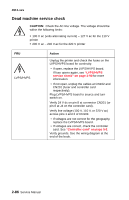
4511-xxx Symptom Paper never picks. Paper feeds continuously. Paper wrinkled or bent. Action See "Paper never picks" on page 2-95. See "Paper picks during POST and/ or continuously" on page 2-94. See "Paper "trees," wrinkles, stacks poorly, or curls" on page 2-96. Service checks Service checks which involve measuring voltages on the LVPS/HVPS (low voltage power supply/high voltage power supply board) should be performed with the printer positioned on its back side. Note: When you make voltage readings, always use frame ground unless another ground is specified. See the wiring diagram in the back of the book for more information. Cooling fan service check FRU Cooling fan Action Make sure the fan cable plug is properly seated at J18 (controller card). Turn the printer off, and disconnect the cooling fan cable from the controller card. Turn the printer on. Within a few seconds, the controller card assembly should apply between +24 V dc to pin 2. • If voltage is present and the fan is not turning, replace the cooling fan. If the fan still doesn't function, replace the controller card. Note: The fan speed is controlled by a module on the printed circuit board. Between +8 V and +24 V dc are constantly supplied at pin 2 (J18). Pin 1 is ground while pin 3 receives feedback from the fan motor. • If voltage is not present, check the cables and all connections. Diagnostics-all models 2-81
-
 1
1 -
2
-
3
-
4
-
5
-
6
-
7
-
8
-
9
-
10
-
11
-
12
-
13
-
14
-
15
-
16
-
17
-
18
-
19
-
20
-
21
-
22
-
23
-
24
-
25
-
26
-
27
-
28
-
29
-
30
-
31
-
32
-
33
-
34
-
35
-
36
-
37
-
38
-
39
-
40
-
41
-
42
-
43
-
44
-
45
-
46
-
47
-
48
-
49
-
50
-
51
-
52
-
53
-
54
-
55
-
56
-
57
-
58
-
59
-
60
-
61
-
62
-
63
-
64
-
65
-
66
-
67
-
68
-
69
-
70
-
71
-
72
-
73
-
74
-
75
-
76
-
77
-
78
-
79
-
80
-
81
-
82
-
83
-
84
-
85
-
86
-
87
-
88
-
89
-
90
-
91
-
92
-
93
-
94
-
95
-
96
-
97
-
98
-
99
-
100
-
101
-
102
-
103
-
104
-
105
-
106
-
107
-
 108
108 -
 109
109 -
 110
110 -
 111
111 -
 112
112 -
 113
113 -
 114
114 -
 115
115 -
 116
116 -
 117
117 -
 118
118 -
119
-
120
-
121
-
122
-
123
-
124
-
125
-
126
-
127
-
128
-
129
-
130
-
131
-
132
-
133
-
134
-
135
-
136
-
137
-
138
-
139
-
140
-
141
-
142
-
143
-
144
-
145
-
146
-
147
-
148
-
149
-
150
-
151
-
152
-
153
-
154
-
155
-
156
-
157
-
158
-
159
-
160
-
161
-
162
-
163
-
164
-
165
-
166
-
167
-
168
-
169
-
170
-
171
-
172
-
173
-
174
-
175
-
176
-
177
-
178
-
179
-
180
-
181
-
182
-
183
-
184
-
185
-
186
-
187
-
188
-
189
-
190
-
191
-
192
-
193
-
194
-
195
-
196
-
197
-
198
-
199
-
200
-
201
-
202
-
203
-
204
-
205
-
206
-
207
-
208
-
209
-
210
-
211
-
212
-
213
-
214
-
215
-
216
-
217
-
218
-
219
-
220
-
221
-
222
-
223
-
224
-
225
-
226
-
227
-
228
-
229
-
230
-
231
-
232
-
233
-
234
-
235
-
236
-
237
-
238
-
239
-
240
-
241
-
242
-
243
-
244
-
245
-
246
-
247
-
248
-
249
-
250
-
251
-
252
-
253
-
254
-
255
-
256
-
257
-
258
-
259
 |
 |
