Lexmark E238 Service Manual - Page 96
Paper jam messages, Message, Explanation - pick rollers
 |
View all Lexmark E238 manuals
Add to My Manuals
Save this manual to your list of manuals |
Page 96 highlights
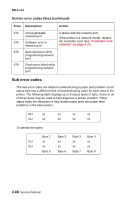
4511-xxx Paper jam messages Repeating jams or jam messages can be caused by any of the following: • Faulty pick solenoids or worn cams of the solenoids. • Faulty flags or springs. • Worn backup rollers at the reference guide. • Improperly adjusted reference guide. • Debris in the paper path. • Paper not of the specified length. Paper jam messages Message Explanation 200 Paper Jam Remove Cartridge The input sensor under print cartridge is covered too long, is covered during POR, or is covered when Go is pressed after clearing a different jam or problem. The exit sensor could also be covered. Remove the print cartridge and open the rear door to remove the media. 201 Paper Jam Remove Cartridge Paper is jammed between the printer input and exit sensor. Remove the print cartridge to clear the paper path. 202 Paper Jam Open Rear Door The exit sensor is either covered during POR or covered too long. Open the rear door to access the jam area. 241 Paper Jam Check Tray 1 Paper is jammed between Tray 1 and the input sensor. 242 Paper Jam Check Tray 2 Tray 2 pass thru sensor is covered during warm-up. Try opening Tray 2. If the tray is difficult to remove, then you may have to remove the tray above. 251 Paper Jam Sensor at the manual feeder indicates paper is Check Manual Feeder stuck in the path. Remove the paper, and check the flag/sensor. 2-64 Service Manual
-
 1
1 -
2
-
3
-
4
-
5
-
6
-
7
-
8
-
9
-
10
-
11
-
12
-
13
-
14
-
15
-
16
-
17
-
18
-
19
-
20
-
21
-
22
-
23
-
24
-
25
-
26
-
27
-
28
-
29
-
30
-
31
-
32
-
33
-
34
-
35
-
36
-
37
-
38
-
39
-
40
-
41
-
42
-
43
-
44
-
45
-
46
-
47
-
48
-
49
-
50
-
51
-
52
-
53
-
54
-
55
-
56
-
57
-
58
-
59
-
60
-
61
-
62
-
63
-
64
-
65
-
66
-
67
-
68
-
69
-
70
-
71
-
72
-
73
-
74
-
75
-
76
-
77
-
78
-
79
-
80
-
81
-
82
-
83
-
84
-
85
-
86
-
87
-
88
-
89
-
90
-
 91
91 -
 92
92 -
 93
93 -
 94
94 -
 95
95 -
 96
96 -
 97
97 -
 98
98 -
 99
99 -
 100
100 -
 101
101 -
102
-
103
-
104
-
105
-
106
-
107
-
108
-
109
-
110
-
111
-
112
-
113
-
114
-
115
-
116
-
117
-
118
-
119
-
120
-
121
-
122
-
123
-
124
-
125
-
126
-
127
-
128
-
129
-
130
-
131
-
132
-
133
-
134
-
135
-
136
-
137
-
138
-
139
-
140
-
141
-
142
-
143
-
144
-
145
-
146
-
147
-
148
-
149
-
150
-
151
-
152
-
153
-
154
-
155
-
156
-
157
-
158
-
159
-
160
-
161
-
162
-
163
-
164
-
165
-
166
-
167
-
168
-
169
-
170
-
171
-
172
-
173
-
174
-
175
-
176
-
177
-
178
-
179
-
180
-
181
-
182
-
183
-
184
-
185
-
186
-
187
-
188
-
189
-
190
-
191
-
192
-
193
-
194
-
195
-
196
-
197
-
198
-
199
-
200
-
201
-
202
-
203
-
204
-
205
-
206
-
207
-
208
-
209
-
210
-
211
-
212
-
213
-
214
-
215
-
216
-
217
-
218
-
219
-
220
-
221
-
222
-
223
-
224
-
225
-
226
-
227
-
228
-
229
-
230
-
231
-
232
-
233
-
234
-
235
-
236
-
237
-
238
-
239
-
240
-
241
-
242
-
243
-
244
-
245
-
246
-
247
-
248
-
249
-
250
-
251
-
252
-
253
-
254
-
255
-
256
-
257
-
258
-
259
 |
 |
