Lexmark E238 Service Manual - Page 125
Operator panel service check (models E340 and E342n), LCD operator panel service check
 |
View all Lexmark E238 manuals
Add to My Manuals
Save this manual to your list of manuals |
Page 125 highlights
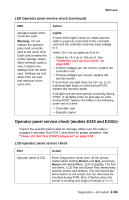
4511-xxx LED Operator panel service check (continued) FRU Operator panel (LED) Controller card Warning: Do not replace the operator panel and controller card at the same time. Each card contains the printer settings. When either of these cards is new, it obtains the settings from the other card. Settings are lost when both are new and replaced at the same time. Action Lights If none of the lights come on, make sure the cable is properly connected to the controller card and the controller card has input voltage to it. Verify +24 V dc on cable pin 8 at J4. • Check for +5 V dc at J19, pin 5. See "Controller card service check" on page 2-82. • If these voltages are not correct, replace the controller card. • If these voltages are correct, replace the operator panel. If more than one light does not turn on, or an individual light stays on solid during POST, replace the operator panel. If all lights are dim and operate erratically during POST, or all lights come on and stay on solid during POST, replace the FRUs in the following order one at a time: • Controller card • Operator panel Operator panel service check (models E340 and E342n) Inspect the operator panel cable for damage. Make sure the cable is plugged in securely. Run POST, and check for proper operation. See "Power-On Self Test (POST) sequence" on page 2-50. LCD operator panel service check FRU Operator panel (LCD) Action Enter Diagnostics mode (turn off the printer, restart while holding Return and Go), and press Menu until HARDWARE TESTS display. The first two items, LCD Test and Button Test interactively test the screen and buttons. The LED below the Menu button is not tested, but can otherwise be checked during POR. Also, it flashes when the printer is working and stays on steady at Ready. Diagnostics-all models 2-93
-
 1
1 -
2
-
3
-
4
-
5
-
6
-
7
-
8
-
9
-
10
-
11
-
12
-
13
-
14
-
15
-
16
-
17
-
18
-
19
-
20
-
21
-
22
-
23
-
24
-
25
-
26
-
27
-
28
-
29
-
30
-
31
-
32
-
33
-
34
-
35
-
36
-
37
-
38
-
39
-
40
-
41
-
42
-
43
-
44
-
45
-
46
-
47
-
48
-
49
-
50
-
51
-
52
-
53
-
54
-
55
-
56
-
57
-
58
-
59
-
60
-
61
-
62
-
63
-
64
-
65
-
66
-
67
-
68
-
69
-
70
-
71
-
72
-
73
-
74
-
75
-
76
-
77
-
78
-
79
-
80
-
81
-
82
-
83
-
84
-
85
-
86
-
87
-
88
-
89
-
90
-
91
-
92
-
93
-
94
-
95
-
96
-
97
-
98
-
99
-
100
-
101
-
102
-
103
-
104
-
105
-
106
-
107
-
108
-
109
-
110
-
111
-
112
-
113
-
114
-
115
-
116
-
117
-
118
-
119
-
 120
120 -
 121
121 -
 122
122 -
 123
123 -
 124
124 -
 125
125 -
 126
126 -
 127
127 -
 128
128 -
 129
129 -
 130
130 -
131
-
132
-
133
-
134
-
135
-
136
-
137
-
138
-
139
-
140
-
141
-
142
-
143
-
144
-
145
-
146
-
147
-
148
-
149
-
150
-
151
-
152
-
153
-
154
-
155
-
156
-
157
-
158
-
159
-
160
-
161
-
162
-
163
-
164
-
165
-
166
-
167
-
168
-
169
-
170
-
171
-
172
-
173
-
174
-
175
-
176
-
177
-
178
-
179
-
180
-
181
-
182
-
183
-
184
-
185
-
186
-
187
-
188
-
189
-
190
-
191
-
192
-
193
-
194
-
195
-
196
-
197
-
198
-
199
-
200
-
201
-
202
-
203
-
204
-
205
-
206
-
207
-
208
-
209
-
210
-
211
-
212
-
213
-
214
-
215
-
216
-
217
-
218
-
219
-
220
-
221
-
222
-
223
-
224
-
225
-
226
-
227
-
228
-
229
-
230
-
231
-
232
-
233
-
234
-
235
-
236
-
237
-
238
-
239
-
240
-
241
-
242
-
243
-
244
-
245
-
246
-
247
-
248
-
249
-
250
-
251
-
252
-
253
-
254
-
255
-
256
-
257
-
258
-
259
 |
 |
