Lexmark E238 Service Manual - Page 226
Printhead removal, Continuous print-simplex Tray 1
 |
View all Lexmark E238 manuals
Add to My Manuals
Save this manual to your list of manuals |
Page 226 highlights
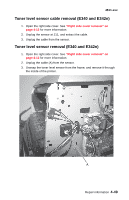
4511-xxx Printhead removal 1. Remove the top cover. See "Top cover removal" on page 4-14 for more information. 2. Remove the right side cover. See "Right side cover removal" on page 4-12. 3. Notice the alignment of the printhead at each screw. 4. Unplug the printhead cables at locations J13 and J14. 5. Remove three screws (A) securing the printhead to the cross brace. A 6. Remove the printhead. Install the new printhead in the same position as the old one. Always run the registration test following replacement, and adjust as needed. See "Registration" on page 3-21. Check skew caused by the printhead by printing the Quick Test. For E340 and E342n, see "Quick Test" on page 3-22. For the E238, E240, and E240n, enter Diagnostic mode (see "Diagnostics mode selections" on page 3-11), and select Continuous print-simplex Tray 1. The printed test sheets have horizontal lines and two vertical lines. Printhead misalignment causes skewed horizontal lines, but not vertical lines (that is, the vertical lines will be parallel to the vertical edges). If the ends of the horizontal lines on the right side drop down from the left side to the right side, adjust the printhead clockwise to the printer. Adjust the printhead counterclockwise if the horizontal lines rise from left to right. 4-48 Service Manual
-
 1
1 -
2
-
3
-
4
-
5
-
6
-
7
-
8
-
9
-
10
-
11
-
12
-
13
-
14
-
15
-
16
-
17
-
18
-
19
-
20
-
21
-
22
-
23
-
24
-
25
-
26
-
27
-
28
-
29
-
30
-
31
-
32
-
33
-
34
-
35
-
36
-
37
-
38
-
39
-
40
-
41
-
42
-
43
-
44
-
45
-
46
-
47
-
48
-
49
-
50
-
51
-
52
-
53
-
54
-
55
-
56
-
57
-
58
-
59
-
60
-
61
-
62
-
63
-
64
-
65
-
66
-
67
-
68
-
69
-
70
-
71
-
72
-
73
-
74
-
75
-
76
-
77
-
78
-
79
-
80
-
81
-
82
-
83
-
84
-
85
-
86
-
87
-
88
-
89
-
90
-
91
-
92
-
93
-
94
-
95
-
96
-
97
-
98
-
99
-
100
-
101
-
102
-
103
-
104
-
105
-
106
-
107
-
108
-
109
-
110
-
111
-
112
-
113
-
114
-
115
-
116
-
117
-
118
-
119
-
120
-
121
-
122
-
123
-
124
-
125
-
126
-
127
-
128
-
129
-
130
-
131
-
132
-
133
-
134
-
135
-
136
-
137
-
138
-
139
-
140
-
141
-
142
-
143
-
144
-
145
-
146
-
147
-
148
-
149
-
150
-
151
-
152
-
153
-
154
-
155
-
156
-
157
-
158
-
159
-
160
-
161
-
162
-
163
-
164
-
165
-
166
-
167
-
168
-
169
-
170
-
171
-
172
-
173
-
174
-
175
-
176
-
177
-
178
-
179
-
180
-
181
-
182
-
183
-
184
-
185
-
186
-
187
-
188
-
189
-
190
-
191
-
192
-
193
-
194
-
195
-
196
-
197
-
198
-
199
-
200
-
201
-
202
-
203
-
204
-
205
-
206
-
207
-
208
-
209
-
210
-
211
-
212
-
213
-
214
-
215
-
216
-
217
-
218
-
219
-
220
-
 221
221 -
 222
222 -
 223
223 -
 224
224 -
 225
225 -
 226
226 -
 227
227 -
 228
228 -
 229
229 -
 230
230 -
 231
231 -
232
-
233
-
234
-
235
-
236
-
237
-
238
-
239
-
240
-
241
-
242
-
243
-
244
-
245
-
246
-
247
-
248
-
249
-
250
-
251
-
252
-
253
-
254
-
255
-
256
-
257
-
258
-
259
 |
 |
