Lexmark E238 Service Manual - Page 227
Toner level sensor cable removal (E340 and E342n), Toner level sensor removal (E340 and E342n
 |
View all Lexmark E238 manuals
Add to My Manuals
Save this manual to your list of manuals |
Page 227 highlights
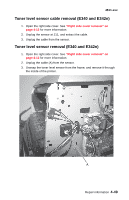
4511-xxx Toner level sensor cable removal (E340 and E342n) 1. Open the right side cover. See "Right side cover removal" on page 4-12 for more information. 2. Unplug the sensor at J11, and extract the cable. 3. Unplug the cable from the sensor. Toner level sensor removal (E340 and E342n) 1. Open the right side cover. See "Right side cover removal" on page 4-12 for more information. 2. Unplug the cable (A) from the sensor. 3. Unsnap the toner level sensor from the frame, and remove it through the inside of the printer. A Repair information 4-49
-
 1
1 -
2
-
3
-
4
-
5
-
6
-
7
-
8
-
9
-
10
-
11
-
12
-
13
-
14
-
15
-
16
-
17
-
18
-
19
-
20
-
21
-
22
-
23
-
24
-
25
-
26
-
27
-
28
-
29
-
30
-
31
-
32
-
33
-
34
-
35
-
36
-
37
-
38
-
39
-
40
-
41
-
42
-
43
-
44
-
45
-
46
-
47
-
48
-
49
-
50
-
51
-
52
-
53
-
54
-
55
-
56
-
57
-
58
-
59
-
60
-
61
-
62
-
63
-
64
-
65
-
66
-
67
-
68
-
69
-
70
-
71
-
72
-
73
-
74
-
75
-
76
-
77
-
78
-
79
-
80
-
81
-
82
-
83
-
84
-
85
-
86
-
87
-
88
-
89
-
90
-
91
-
92
-
93
-
94
-
95
-
96
-
97
-
98
-
99
-
100
-
101
-
102
-
103
-
104
-
105
-
106
-
107
-
108
-
109
-
110
-
111
-
112
-
113
-
114
-
115
-
116
-
117
-
118
-
119
-
120
-
121
-
122
-
123
-
124
-
125
-
126
-
127
-
128
-
129
-
130
-
131
-
132
-
133
-
134
-
135
-
136
-
137
-
138
-
139
-
140
-
141
-
142
-
143
-
144
-
145
-
146
-
147
-
148
-
149
-
150
-
151
-
152
-
153
-
154
-
155
-
156
-
157
-
158
-
159
-
160
-
161
-
162
-
163
-
164
-
165
-
166
-
167
-
168
-
169
-
170
-
171
-
172
-
173
-
174
-
175
-
176
-
177
-
178
-
179
-
180
-
181
-
182
-
183
-
184
-
185
-
186
-
187
-
188
-
189
-
190
-
191
-
192
-
193
-
194
-
195
-
196
-
197
-
198
-
199
-
200
-
201
-
202
-
203
-
204
-
205
-
206
-
207
-
208
-
209
-
210
-
211
-
212
-
213
-
214
-
215
-
216
-
217
-
218
-
219
-
220
-
221
-
 222
222 -
 223
223 -
 224
224 -
 225
225 -
 226
226 -
 227
227 -
 228
228 -
 229
229 -
 230
230 -
 231
231 -
 232
232 -
233
-
234
-
235
-
236
-
237
-
238
-
239
-
240
-
241
-
242
-
243
-
244
-
245
-
246
-
247
-
248
-
249
-
250
-
251
-
252
-
253
-
254
-
255
-
256
-
257
-
258
-
259
 |
 |

4511-xxx
Repair information
4-49
Toner level sensor cable removal (E340 and E342n)
1.
Open the right side cover. See
“Right side cover removal” on
page 4-12
for more information.
2.
Unplug the sensor at J11, and extract the cable.
3.
Unplug the cable from the sensor.
Toner level sensor removal (E340 and E342n)
1.
Open the right side cover. See
“Right side cover removal” on
page 4-12
for more information.
2.
Unplug the cable (A) from the sensor.
3.
Unsnap
the toner level sensor from the frame, and remove it through
the inside of the printer.
A