Lexmark E238 Service Manual - Page 119
Fuser service check, Warning, Action, Step 1: Continuity
 |
View all Lexmark E238 manuals
Add to My Manuals
Save this manual to your list of manuals |
Page 119 highlights
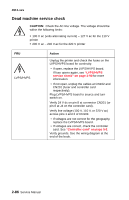
4511-xxx Fuser service check When toner is partially fused to the paper, it is usually caused by low fuser temperature. Warning: Avoid handling the lamp as much as possible, as it is easily broken. Be careful not to touch the glass housing with bare hands, because skin acids can weaken the glass. Note: The lamp is not a service part. The line voltage to the printer must be within the following limits: • 100 V ac-127 V ac for the 110 V model printer • 200 V ac-240 V ac for the 220 V model printer Turn the printer off, and wait a few minutes for the fuser lamp to cool. Turn the printer on, and observe the lamp turning on during POST. You can see the light from the lamp by opening the left side cover and observing the upper opening through which the fuser power cables pass. Fuser service check FRU Fuser power cable LVPS/HVPS Fuser Action Unplug the printer, and disconnect the fuser lamp cable plug from the LVPS/HVPS board connector at CN102. Check for continuity across the fuser lamp by checking across the connector pins. • If there is continuity, go to Step 1: Continuity. • If there is no continuity, go to Step 2: No continuity. Step 1: Continuity Turn the printer on with only the fuser power disconnected. Measure the voltage at connector CN102 on the LVPS/HVPS. It should match the line voltage. If line voltage is not present, see "LVPS/HVPS service check" on page 2-90 for more information. Make sure the fuser thermistor is correctly connected to the controller board. If the problem persists, disconnect the thermistor cable at J16, and check for less than +5 V dc on pin 1. Pin 2 should be ground. If line voltage is incorrect on pin 1, see "Controller card service check" on page 2-82 for more information. Diagnostics-all models 2-87
-
 1
1 -
2
-
3
-
4
-
5
-
6
-
7
-
8
-
9
-
10
-
11
-
12
-
13
-
14
-
15
-
16
-
17
-
18
-
19
-
20
-
21
-
22
-
23
-
24
-
25
-
26
-
27
-
28
-
29
-
30
-
31
-
32
-
33
-
34
-
35
-
36
-
37
-
38
-
39
-
40
-
41
-
42
-
43
-
44
-
45
-
46
-
47
-
48
-
49
-
50
-
51
-
52
-
53
-
54
-
55
-
56
-
57
-
58
-
59
-
60
-
61
-
62
-
63
-
64
-
65
-
66
-
67
-
68
-
69
-
70
-
71
-
72
-
73
-
74
-
75
-
76
-
77
-
78
-
79
-
80
-
81
-
82
-
83
-
84
-
85
-
86
-
87
-
88
-
89
-
90
-
91
-
92
-
93
-
94
-
95
-
96
-
97
-
98
-
99
-
100
-
101
-
102
-
103
-
104
-
105
-
106
-
107
-
108
-
109
-
110
-
111
-
112
-
113
-
 114
114 -
 115
115 -
 116
116 -
 117
117 -
 118
118 -
 119
119 -
 120
120 -
 121
121 -
 122
122 -
 123
123 -
 124
124 -
125
-
126
-
127
-
128
-
129
-
130
-
131
-
132
-
133
-
134
-
135
-
136
-
137
-
138
-
139
-
140
-
141
-
142
-
143
-
144
-
145
-
146
-
147
-
148
-
149
-
150
-
151
-
152
-
153
-
154
-
155
-
156
-
157
-
158
-
159
-
160
-
161
-
162
-
163
-
164
-
165
-
166
-
167
-
168
-
169
-
170
-
171
-
172
-
173
-
174
-
175
-
176
-
177
-
178
-
179
-
180
-
181
-
182
-
183
-
184
-
185
-
186
-
187
-
188
-
189
-
190
-
191
-
192
-
193
-
194
-
195
-
196
-
197
-
198
-
199
-
200
-
201
-
202
-
203
-
204
-
205
-
206
-
207
-
208
-
209
-
210
-
211
-
212
-
213
-
214
-
215
-
216
-
217
-
218
-
219
-
220
-
221
-
222
-
223
-
224
-
225
-
226
-
227
-
228
-
229
-
230
-
231
-
232
-
233
-
234
-
235
-
236
-
237
-
238
-
239
-
240
-
241
-
242
-
243
-
244
-
245
-
246
-
247
-
248
-
249
-
250
-
251
-
252
-
253
-
254
-
255
-
256
-
257
-
258
-
259
 |
 |
