Lexmark T430 Service Manual - Page 83
Parallel port service check
 |
View all Lexmark T430 manuals
Add to My Manuals
Save this manual to your list of manuals |
Page 83 highlights
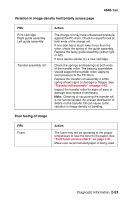
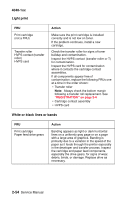
Paper "trees," wrinkles, stacks poorly or curls 4048-1xx FRU Fuser assembly Action This problem is most likely due to a worn backup roller. A worn backup roller causes the printer to run hotter than required for the media being printed. Excessive heat can cause paper treeing problems, poor stacking, or excessive curl. Parallel port service check 1. Perform a print test to make sure the printer prints correctly. See "Prt Quality Pgs" on page 3-6 for more information. 2. Be sure the printer cable is designed for bidirectional printing. 3. Be sure the user application is set up correctly. 4. An extra long parallel cable may require some adjustment in the Par S strobe. See "Par S Strobe Adj" on page 3-16. 5. Some computers assume the printer samples data on the trailing edge of the strobe. This printer samples data on the leading edge by default. This process can be switched by turning Parallel Mode 2 off. To change this setting: a. Select PARALLEL MENU from the Ready Menu. b. Select Parallel Mode 2. Selections are On and Off. 6. If the printer fails to print on command from the host, verify the following: a. Internal print test page prints correctly. b. The user application/printer driver is set up correctly. c. The host computer has been restarted. d. The bidirectional parallel cable is connected correctly and is functional. If the printer still fails to print correctly, replace the controller card assembly. Note: Always check printhead alignment after replacing the controller card assembly. See "Printhead assembly adjustment" on page 4-2. Diagnostic information 2-49
-
 1
1 -
2
-
3
-
4
-
5
-
6
-
7
-
8
-
9
-
10
-
11
-
12
-
13
-
14
-
15
-
16
-
17
-
18
-
19
-
20
-
21
-
22
-
23
-
24
-
25
-
26
-
27
-
28
-
29
-
30
-
31
-
32
-
33
-
34
-
35
-
36
-
37
-
38
-
39
-
40
-
41
-
42
-
43
-
44
-
45
-
46
-
47
-
48
-
49
-
50
-
51
-
52
-
53
-
54
-
55
-
56
-
57
-
58
-
59
-
60
-
61
-
62
-
63
-
64
-
65
-
66
-
67
-
68
-
69
-
70
-
71
-
72
-
73
-
74
-
75
-
76
-
77
-
 78
78 -
 79
79 -
 80
80 -
 81
81 -
 82
82 -
 83
83 -
 84
84 -
 85
85 -
 86
86 -
 87
87 -
 88
88 -
89
-
90
-
91
-
92
-
93
-
94
-
95
-
96
-
97
-
98
-
99
-
100
-
101
-
102
-
103
-
104
-
105
-
106
-
107
-
108
-
109
-
110
-
111
-
112
-
113
-
114
-
115
-
116
-
117
-
118
-
119
-
120
-
121
-
122
-
123
-
124
-
125
-
126
-
127
-
128
-
129
-
130
-
131
-
132
-
133
-
134
-
135
-
136
-
137
-
138
-
139
-
140
-
141
-
142
-
143
-
144
-
145
-
146
-
147
-
148
-
149
-
150
-
151
-
152
-
153
-
154
-
155
-
156
-
157
-
158
-
159
-
160
-
161
-
162
-
163
-
164
-
165
-
166
-
167
-
168
-
169
-
170
-
171
-
172
-
173
-
174
-
175
-
176
-
177
-
178
-
179
-
180
-
181
-
182
-
183
-
184
-
185
-
186
-
187
-
188
-
189
-
190
-
191
-
192
-
193
-
194
-
195
-
196
-
197
-
198
-
199
-
200
-
201
-
202
-
203
-
204
-
205
-
206
-
207
-
208
-
209
-
210
-
211
-
212
-
213
-
214
-
215
-
216
-
217
-
218
-
219
-
220
-
221
-
222
-
223
-
224
-
225
-
226
-
227
-
228
-
229
-
230
-
231
-
232
-
233
-
234
-
235
-
236
-
237
-
238
-
239
-
240
-
241
-
242
-
243
-
244
-
245
-
246
-
247
-
248
-
249
 |
 |
