Lexmark T430 Service Manual - Page 84
Print quality service checks
 |
View all Lexmark T430 manuals
Add to My Manuals
Save this manual to your list of manuals |
Page 84 highlights
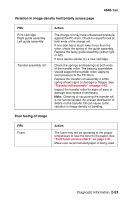
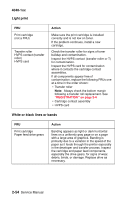
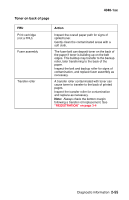
4048-1xx Print quality service checks Blank page FRU Print cartridge (not a FRU) Printhead Printhead cable HVPS Controller card assembly Cartridge contacts assembly Action Remove the print cartridge and gently shake the assembly to evenly distribute the toner. Ensure clean electrical contacts on the right side of the cartridge. Blank pages can be caused by a defective printhead assembly, HVPS, or controller card assembly. See "Controller card service check" on page 2-38 and verify +24 V dc on pin #5 at J1 and +5 V dc on pin #7 at J3. Verify ground on pin #4 at J1 and on pin #6 at J3. If these are not correct, replace the controller card. See "Controller card assembly removal" on page 4-50. If the voltages are correct, check the printhead cable for continuity. • If the cable has continuity, replace the printhead. See "Printhead removal" on page 4-46 • If the cable does not have continuity, replace the cable. With the cartridge removed and the printer off, check continuity between HVPS (DC designation on outer side of card) and the PC pin inside the printer. The PC pin is directly above the transfer roll gear. Replace the cartridge contacts as necessary. See "High voltage power supply (HVPS)" on page 5-8. Verify input voltages of +24 V dc (pin #4) and +5 V dc (pin #7). • If incorrect, verify the continuity of the cable. Replace if necessary. Note: Pins 1-8 on the HVPS correspond to pins 4-11 respectively of J19 on the controller card. • If correct, replace the HVPS only after verifying all the above items. 2-50 Service Manual
-
 1
1 -
2
-
3
-
4
-
5
-
6
-
7
-
8
-
9
-
10
-
11
-
12
-
13
-
14
-
15
-
16
-
17
-
18
-
19
-
20
-
21
-
22
-
23
-
24
-
25
-
26
-
27
-
28
-
29
-
30
-
31
-
32
-
33
-
34
-
35
-
36
-
37
-
38
-
39
-
40
-
41
-
42
-
43
-
44
-
45
-
46
-
47
-
48
-
49
-
50
-
51
-
52
-
53
-
54
-
55
-
56
-
57
-
58
-
59
-
60
-
61
-
62
-
63
-
64
-
65
-
66
-
67
-
68
-
69
-
70
-
71
-
72
-
73
-
74
-
75
-
76
-
77
-
78
-
 79
79 -
 80
80 -
 81
81 -
 82
82 -
 83
83 -
 84
84 -
 85
85 -
 86
86 -
 87
87 -
 88
88 -
 89
89 -
90
-
91
-
92
-
93
-
94
-
95
-
96
-
97
-
98
-
99
-
100
-
101
-
102
-
103
-
104
-
105
-
106
-
107
-
108
-
109
-
110
-
111
-
112
-
113
-
114
-
115
-
116
-
117
-
118
-
119
-
120
-
121
-
122
-
123
-
124
-
125
-
126
-
127
-
128
-
129
-
130
-
131
-
132
-
133
-
134
-
135
-
136
-
137
-
138
-
139
-
140
-
141
-
142
-
143
-
144
-
145
-
146
-
147
-
148
-
149
-
150
-
151
-
152
-
153
-
154
-
155
-
156
-
157
-
158
-
159
-
160
-
161
-
162
-
163
-
164
-
165
-
166
-
167
-
168
-
169
-
170
-
171
-
172
-
173
-
174
-
175
-
176
-
177
-
178
-
179
-
180
-
181
-
182
-
183
-
184
-
185
-
186
-
187
-
188
-
189
-
190
-
191
-
192
-
193
-
194
-
195
-
196
-
197
-
198
-
199
-
200
-
201
-
202
-
203
-
204
-
205
-
206
-
207
-
208
-
209
-
210
-
211
-
212
-
213
-
214
-
215
-
216
-
217
-
218
-
219
-
220
-
221
-
222
-
223
-
224
-
225
-
226
-
227
-
228
-
229
-
230
-
231
-
232
-
233
-
234
-
235
-
236
-
237
-
238
-
239
-
240
-
241
-
242
-
243
-
244
-
245
-
246
-
247
-
248
-
249
 |
 |
