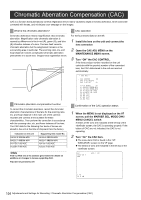
Panasonic P2 HD Camcorder Operating Instructions - Page 100
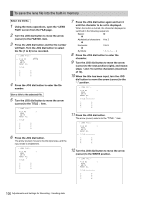
To save the lens file into the built-in memory, cursor to the TITLE
 |
View all Panasonic P2 HD Camcorder manuals
Add to My Manuals
Save this manual to your list of manuals |
Page 100 highlights
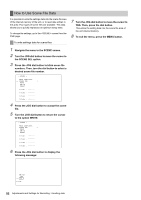
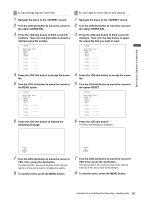
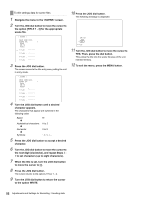
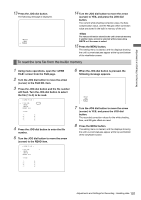
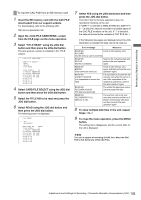
To save the lens file into the built-in memory Select the file No. 1 Using the menu operations, open the screen from the FILE page. 2 Turn the JOG dial button to move the arrow (cursor) to the FILE NO. item. 3 Press the JOG dial button and the file number will flash. Turn the JOG dial button to select the file (1 to 8) to be recorded. < LENS FILE > # FILE NO. :1 READ WRITE RESET ALL TITLE: 1: 5: 2: 6: 3: 7: 4: 8: 4 Press the JOG dial button to enter the file number. Give a title to the selected file. 5 Turn the JOG dial button to move the arrow (cursor) to the TITLE : item. < LENS FILE > FILE NO. :1 READ WRITE RESET ALL # TITLE: 1: 5: 2: 6: 3: 7: 4: 8: 6 Press the JOG dial button. The arrow (cursor) moves to the title input area, and the input mode is established. < LENS FILE > FILE NO. :1 READ WRITE RESET ALL ; TITLE: 1: 5: 2: 6: 3: 7: 4: 8: 7 Press the JOG dial button again and turn it until the character to be set is displayed. When the button is turned, the character displayed is switched in the following sequence: Space: † Ð Alphabetical characters: A to Z Ð Numerals: Ð 0 to 9 Symbols: x 8 Press the JOG dial button to enter the character. 9 Turn the JOG dial button to move the arrow (cursor) to the next position (right), and repeat steps 7 and 8 to set the characters (maximum of 12). 10 When the title has been input, turn the JOG dial button to move the arrow (cursor) to the ":" position. < LENS FILE > FILE NO. :1 READ WRITE RESET ALL ; TITLE 1: 5: 2: 6: 3: 7: 4: 8: 11 Press the JOG dial button. The arrow (cursor) returns to the "TITLE : " item. < LENS FILE > FILE NO. :1 READ WRITE RESET ALL # TITLE 1: 5: 2: 6: 3: 7: 4: 8: 12 Turn the JOG dial button to move the arrow (cursor) to the WRITE position. < LENS FILE > FILE NO. :1 READ # WRITE RESET ALL TITLE 1: 5: 2: 6: 3: 7: 4: 8: 100 Adjustments and Settings for Recording : Handling data
-
 1
1 -
2
-
3
-
4
-
5
-
6
-
7
-
8
-
9
-
10
-
11
-
12
-
13
-
14
-
15
-
16
-
17
-
18
-
19
-
20
-
21
-
22
-
23
-
24
-
25
-
26
-
27
-
28
-
29
-
30
-
31
-
32
-
33
-
34
-
35
-
36
-
37
-
38
-
39
-
40
-
41
-
42
-
43
-
44
-
45
-
46
-
47
-
48
-
49
-
50
-
51
-
52
-
53
-
54
-
55
-
56
-
57
-
58
-
59
-
60
-
61
-
62
-
63
-
64
-
65
-
66
-
67
-
68
-
69
-
70
-
71
-
72
-
73
-
74
-
75
-
76
-
77
-
78
-
79
-
80
-
81
-
82
-
83
-
84
-
85
-
86
-
87
-
88
-
89
-
90
-
91
-
92
-
93
-
94
-
 95
95 -
 96
96 -
 97
97 -
 98
98 -
 99
99 -
 100
100 -
 101
101 -
 102
102 -
 103
103 -
 104
104 -
 105
105 -
106
-
107
-
108
-
109
-
110
-
111
-
112
-
113
-
114
-
115
-
116
-
117
-
118
-
119
-
120
-
121
-
122
-
123
-
124
-
125
-
126
-
127
-
128
-
129
-
130
-
131
-
132
-
133
-
134
-
135
-
136
-
137
-
138
-
139
-
140
-
141
-
142
-
143
-
144
-
145
-
146
-
147
-
148
-
149
-
150
-
151
-
152
-
153
-
154
-
155
-
156
-
157
-
158
-
159
-
160
-
161
-
162
-
163
-
164
-
165
-
166
-
167
-
168
-
169
-
170
-
171
-
172
-
173
-
174
-
175
-
176
-
177
-
178
-
179
-
180
-
181
-
182
-
183
-
184
-
185
-
186
-
187
-
188
-
189
-
190
-
191
-
192
-
193
-
194
-
195
-
196
-
197
-
198
-
199
-
200
-
201
-
202
-
203
-
204
-
205
-
206
-
207
-
208
 |
 |
