Panasonic P2 HD Camcorder Operating Instructions - Page 112
GAMMA MODE SEL is set to HD. Then, open, Again, use the AUTO W/B BAL switch
 |
View all Panasonic P2 HD Camcorder manuals
Add to My Manuals
Save this manual to your list of manuals |
Page 112 highlights
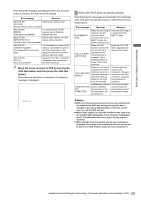
8 Repeat Steps 5 to 7 until the lens is in focus at both the telephoto and wide-angle positions. 9 Firmly tighten the F.f ring clamping screw. Adjusting the Lens White Shading Method to correct the waveform to be more flat by combining the sawtooth-shaped waveform and the parabola waveform when watching the respective waveforms of R, G and B of the video signals. Adjust the white shading in the following manner after turning OFF the DS. GAIN and D.ZOOM. ‹Note Coloring may occur in the vertical direction near where the lens aperture is open even when the white shading has been adjusted. This is something that is inherent to lenses and optical systems and is therefore not indicative of a failure or malfunctioning. 1 Attach the lens to the camera. At this stage, do not forget to connect the lens cable. 2 Set the electronic shutter to OFF and the gain to "L (0 dB)". 3 If the extender is attached to the lens, release the extender function. 4 Open the screen from the PAINT page using the menu operation to confirm that GAMMA MODE SEL is set to "HD". Then, open from the VF page to confirm that ZEBRA1 DETECT and ZEBRA2 DETECT are the same as shown in the following illustration. If they are not the same, revise the settings and close the menu screen. # < VF DISPLAY > DISP CONDITION DISP MODE VF OUT VF DTL ZEBRA1 DETECT ZEBRA2 DETECT ZEBRA2 LOW LIGHT LVL RC MENU DISP. 50M INDICATOR. MARKER/CHAR LVL SYNCHRO SCAN DISP. :NORMAL :3 :Y :05 :070% :085% :SPOT :35% :OFF :OFF :50% :sec 5 Set the ZEBRA switch on the viewfinder to ON. 6 Shoot a white sheet of paper with no unevenness of color. ‹Note Since fluorescent lights, mercury lamps and other such kinds of lighting tend to flicker, use a light source which is free from flicker such as sunlight or a halogen lamp. 7 Set the lens aperture control to manual, and adjust it so that the zebra pattern covers the whole screen. Check that the lens aperture is between F4 and F11. ‹Notes z The zebra pattern will not cover the whole screen if there is any unevenness in the lighting. In this case, make adjustments to the position of the lighting, etc. z Make adjustments to the position of the lighting, etc. also when the lens aperture is not between F4 and F11. z Be absolutely sure to leave the electronic shutter at OFF. 8 1 Set the WHITE BAL selector switch to "A" or "B," and use the AUTO W/B BAL switch to adjust the white balance automatically (AWB). 2 Use the AUTO W/B BAL switch to adjust the black balance automatically (ABB). 3 Again, use the AUTO W/B BAL switch to adjust the white balance automatically (AWB). 9 Repeat step 7. 10 Using the menu operation, open the screen from the MAINTENANCE page and a range of items from R H SAW item to B V PARA item, so that the waveform is more flat. < WHITE SHADING > CORRECT # R H SAW R H PARA R V SAW R V PARA G H SAW G H PARA G V SAW G V PARA B H SAW B H PARA B V SAW B V PARA :ON :+000 :+000 :+000 :+000 :+000 :+000 :+000 :+000 :+000 :+000 :+000 :+000 H SAW Before correction H PARA After correction 112 Preparation: Mounting the Lens and Performing the Flange Back and White Shading Adjustments
-
 1
1 -
2
-
3
-
4
-
5
-
6
-
7
-
8
-
9
-
10
-
11
-
12
-
13
-
14
-
15
-
16
-
17
-
18
-
19
-
20
-
21
-
22
-
23
-
24
-
25
-
26
-
27
-
28
-
29
-
30
-
31
-
32
-
33
-
34
-
35
-
36
-
37
-
38
-
39
-
40
-
41
-
42
-
43
-
44
-
45
-
46
-
47
-
48
-
49
-
50
-
51
-
52
-
53
-
54
-
55
-
56
-
57
-
58
-
59
-
60
-
61
-
62
-
63
-
64
-
65
-
66
-
67
-
68
-
69
-
70
-
71
-
72
-
73
-
74
-
75
-
76
-
77
-
78
-
79
-
80
-
81
-
82
-
83
-
84
-
85
-
86
-
87
-
88
-
89
-
90
-
91
-
92
-
93
-
94
-
95
-
96
-
97
-
98
-
99
-
100
-
101
-
102
-
103
-
104
-
105
-
106
-
 107
107 -
 108
108 -
 109
109 -
 110
110 -
 111
111 -
 112
112 -
 113
113 -
 114
114 -
 115
115 -
 116
116 -
 117
117 -
118
-
119
-
120
-
121
-
122
-
123
-
124
-
125
-
126
-
127
-
128
-
129
-
130
-
131
-
132
-
133
-
134
-
135
-
136
-
137
-
138
-
139
-
140
-
141
-
142
-
143
-
144
-
145
-
146
-
147
-
148
-
149
-
150
-
151
-
152
-
153
-
154
-
155
-
156
-
157
-
158
-
159
-
160
-
161
-
162
-
163
-
164
-
165
-
166
-
167
-
168
-
169
-
170
-
171
-
172
-
173
-
174
-
175
-
176
-
177
-
178
-
179
-
180
-
181
-
182
-
183
-
184
-
185
-
186
-
187
-
188
-
189
-
190
-
191
-
192
-
193
-
194
-
195
-
196
-
197
-
198
-
199
-
200
-
201
-
202
-
203
-
204
-
205
-
206
-
207
-
208
 |
 |
