Panasonic P2 HD Camcorder Operating Instructions - Page 97
following message, Press the JOG dial button to display
 |
View all Panasonic P2 HD Camcorder manuals
Add to My Manuals
Save this manual to your list of manuals |
Page 97 highlights
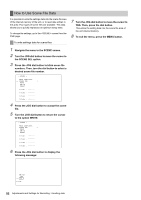
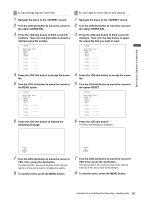
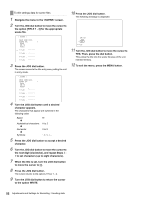
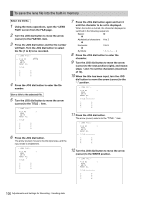
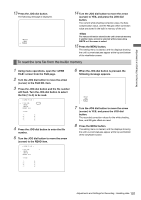
Adjustments and Settings for Recording To read settings data for scene files 1 Navigate the menu to the screen. 2 Turn the JOG dial button to move the cursor to the option SCENE SEL. 3 Press the JOG dial button to blink scene file numbers. Then, turn the dial button to select a desired scene file number. < SCENE > READ USER DATA # SCENE SEL :1 READ WRITE RESET TITLE1 : ******** TITLE2 : ******** TITLE3 : ******** TITLE4 : ******** 4 Press the JOG dial button to accept the scene file. 5 Turn the JOG dial button to move the cursor to the READ option. < SCENE > READ USER DATA SCENE SEL :1 # READ WRITE RESET TITLE1 : ******** TITLE2 : ******** TITLE3 : ******** TITLE4 : ******** 6 Press the JOG dial button to display the following message: To return data for scene files to their defaults 1 Navigate the menu to the screen. 2 Turn the JOG dial button to move the cursor to the option SCENE SEL. 3 Press the JOG dial button to blink scene file numbers. Then, turn the dial button to select the scene file that you want to reset. < SCENE > READ USER DATA # SCENE SEL :1 READ WRITE RESET TITLE1 : ******** TITLE2 : ******** TITLE3 : ******** TITLE4 : ******** 4 Press the JOG dial button to accept the scene file. 5 Turn the JOG dial button to move the cursor to the option RESET. < SCENE > READ USER DATA SCENE SEL :1 READ WRITE # RESET TITLE1 : ******** TITLE2 : ******** TITLE3 : ******** TITLE4 : ******** 6 Press the JOG dial button. The following message is displayed. READ? YES # NO RESET? YES # NO 7 Turn the JOG dial button to move the cursor to YES. Then, press the dial button. The data stored in the scene file area of the internal memory of the unit is read to complete the setting. 8 To exit the menu, press the MENU button. 7 Turn the JOG dial button to move the cursor to YES. Then, press the dial button. The data stored in the scene file area of the internal memory of the unit is reset to the defaults. 8 To exit the menu, press the MENU button. 97 Adjustments and Settings for Recording : Handling data
-
 1
1 -
2
-
3
-
4
-
5
-
6
-
7
-
8
-
9
-
10
-
11
-
12
-
13
-
14
-
15
-
16
-
17
-
18
-
19
-
20
-
21
-
22
-
23
-
24
-
25
-
26
-
27
-
28
-
29
-
30
-
31
-
32
-
33
-
34
-
35
-
36
-
37
-
38
-
39
-
40
-
41
-
42
-
43
-
44
-
45
-
46
-
47
-
48
-
49
-
50
-
51
-
52
-
53
-
54
-
55
-
56
-
57
-
58
-
59
-
60
-
61
-
62
-
63
-
64
-
65
-
66
-
67
-
68
-
69
-
70
-
71
-
72
-
73
-
74
-
75
-
76
-
77
-
78
-
79
-
80
-
81
-
82
-
83
-
84
-
85
-
86
-
87
-
88
-
89
-
90
-
91
-
 92
92 -
 93
93 -
 94
94 -
 95
95 -
 96
96 -
 97
97 -
 98
98 -
 99
99 -
 100
100 -
 101
101 -
 102
102 -
103
-
104
-
105
-
106
-
107
-
108
-
109
-
110
-
111
-
112
-
113
-
114
-
115
-
116
-
117
-
118
-
119
-
120
-
121
-
122
-
123
-
124
-
125
-
126
-
127
-
128
-
129
-
130
-
131
-
132
-
133
-
134
-
135
-
136
-
137
-
138
-
139
-
140
-
141
-
142
-
143
-
144
-
145
-
146
-
147
-
148
-
149
-
150
-
151
-
152
-
153
-
154
-
155
-
156
-
157
-
158
-
159
-
160
-
161
-
162
-
163
-
164
-
165
-
166
-
167
-
168
-
169
-
170
-
171
-
172
-
173
-
174
-
175
-
176
-
177
-
178
-
179
-
180
-
181
-
182
-
183
-
184
-
185
-
186
-
187
-
188
-
189
-
190
-
191
-
192
-
193
-
194
-
195
-
196
-
197
-
198
-
199
-
200
-
201
-
202
-
203
-
204
-
205
-
206
-
207
-
208
 |
 |
