Panasonic P2 HD Camcorder Operating Instructions - Page 87
Adjusting and setting the LCD monitor
 |
View all Panasonic P2 HD Camcorder manuals
Add to My Manuals
Save this manual to your list of manuals |
Page 87 highlights
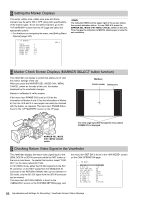
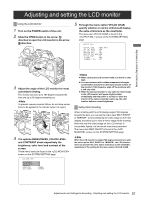
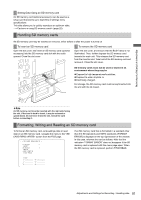
Adjustments and Settings for Recording Adjusting and setting the LCD monitor Using the LCD Monitor 1 Turn on the POWER switch of the unit. 2 Slide the OPEN button in the arrow 1 direction to open the LCD monitor in the arrow 2 direction. 5 Through the menu option VF/LCD CHAR, specify whether or not the LCD should display the same characters as the viewfinder. The menu item VF/LCD CHAR is found in the screen on the SYSTEM SETTING page. OUTPUT ITEM :MENU ONLY SDI OUT MODE :MEM SDI OUT CHAR :ON MONITOR OUT :VBS MONITOR OUT MODE:MEM # VF/LCD CHAR :ON VF MODE :MEM THUMBNAIL OUT :OFF 3 Adjust the angle of the LCD monitor for most convenient viewing. The monitor can turn up to 180 degrees towards the lens and up to 90 degrees towards you. ‹Note To prevent camera-recorder failure, do not allow undue force to be applied to the monitor (when it is open). 4 The options BRIGHTNESS, COLOR LEVEL, and CONTRAST show respectively the brightness, color level and contrast of the screen. These menu items are found in the screen on the SYSTEM SETTING page. # BRIGHTNESS COLOR LEVEL CONTRAST BACKLIGHT SELF SHOOT :+0 :+0 :+0 :NORMAL :MIRROR ‹Notes z When closing the LCD monitor make sure that it is shut tight. z In an environment with sudden temperature changes, condensation may form on the liquid crystal surface of the monitor. If this happens, wipe off the moisture with a soft, dry cloth. z When the camera-recorder is very cold, the video image in the LCD monitor will appear slightly darker immediately after the power is turned on. Once the interior of the camera-recorder warms up, the LCD monitor delivers normal brightness. Self-portrait Shooting When shooting with the LCD display angled 180 degrees towards the lens, you can set the menu item SELF SHOOT to "MIRROR", to horizontally flip the video image on the LCD display, and allow you to view a mirror image while shooting. Note that only the video image on the LCD monitor is horizontally flipped, not the actual video being recorded. The menu item SELF SHOOT is found in the screen on the SYSTEM SETTING page. ‹Note When the LCD monitor is angled 180 degrees towards you with the menu option SELF SHOOT to "MIRROR", the LCD monitor does not provide the same status indication as the viewfinder, regardless of the setting for the menu option VF/LCD CHAR. 87 Adjustments and Settings for Recording : Adjusting and setting the LCD monitor
-
 1
1 -
2
-
3
-
4
-
5
-
6
-
7
-
8
-
9
-
10
-
11
-
12
-
13
-
14
-
15
-
16
-
17
-
18
-
19
-
20
-
21
-
22
-
23
-
24
-
25
-
26
-
27
-
28
-
29
-
30
-
31
-
32
-
33
-
34
-
35
-
36
-
37
-
38
-
39
-
40
-
41
-
42
-
43
-
44
-
45
-
46
-
47
-
48
-
49
-
50
-
51
-
52
-
53
-
54
-
55
-
56
-
57
-
58
-
59
-
60
-
61
-
62
-
63
-
64
-
65
-
66
-
67
-
68
-
69
-
70
-
71
-
72
-
73
-
74
-
75
-
76
-
77
-
78
-
79
-
80
-
81
-
 82
82 -
 83
83 -
 84
84 -
 85
85 -
 86
86 -
 87
87 -
 88
88 -
 89
89 -
 90
90 -
 91
91 -
 92
92 -
93
-
94
-
95
-
96
-
97
-
98
-
99
-
100
-
101
-
102
-
103
-
104
-
105
-
106
-
107
-
108
-
109
-
110
-
111
-
112
-
113
-
114
-
115
-
116
-
117
-
118
-
119
-
120
-
121
-
122
-
123
-
124
-
125
-
126
-
127
-
128
-
129
-
130
-
131
-
132
-
133
-
134
-
135
-
136
-
137
-
138
-
139
-
140
-
141
-
142
-
143
-
144
-
145
-
146
-
147
-
148
-
149
-
150
-
151
-
152
-
153
-
154
-
155
-
156
-
157
-
158
-
159
-
160
-
161
-
162
-
163
-
164
-
165
-
166
-
167
-
168
-
169
-
170
-
171
-
172
-
173
-
174
-
175
-
176
-
177
-
178
-
179
-
180
-
181
-
182
-
183
-
184
-
185
-
186
-
187
-
188
-
189
-
190
-
191
-
192
-
193
-
194
-
195
-
196
-
197
-
198
-
199
-
200
-
201
-
202
-
203
-
204
-
205
-
206
-
207
-
208
 |
 |
