Panasonic P2 HD Camcorder Operating Instructions - Page 110
Use of the external DC power supply, power supply.
 |
View all Panasonic P2 HD Camcorder manuals
Add to My Manuals
Save this manual to your list of manuals |
Page 110 highlights
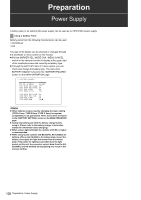
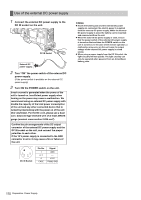
Use of the external DC power supply 1 Connect the external DC power supply to the DC IN socket on the unit. DC IN Socket External DC power supply 2 Turn "ON" the power switch of the external DC power supply. (If the power switch is available on the external DC power supply) 3 Turn ON the POWER switch on the unit. Inrush current is generated when the power of the unit is turned on. Insufficient power supply when turning on the power may cause a malfunction. We recommend using an external DC power supply with double the capacity of the total power consumption of the unit and any other connected device that is turned by interlocking with the power on of the unit (the viewfinder). For the DC cord, please use a dualcore, balanced type shielded wire of at least AWG18 gauge (nominal cross section 0.824 mm2). Confirm the pin arrangements of the DC output connector of the external DC power supply and the DC IN socket on the unit, and connect the proper polarities to each other. If the 12 V power supply is connected to the GND connector in error, it may cause a fire or failure of the unit. 1 2 4 3 DC IN Socket Pin No. 1 2, 3 4 CASE Signal GND - +12V FRAME GND ‹Notes z If both the battery pack and the external DC power supply are connected, the electric power is supplied from the external DC power supply. While the external DC power supply is used, the battery can be mounted and removed on/from the unit. z When the external DC power supply is used, ensure that the power switch of the external DC power supply is turned on first and then the POWER switch on the unit is turned on. In the case of the reverse operation, a malfunction may occur on the unit since the output voltage of the external DC power supply is raised slowly. z When using a power supply from the DC IN socket, the light circuitry will not operate. The light circuitry can only be operated when powered from an Anton/Bauer battery plate. 110 Preparation: Power Supply
-
 1
1 -
2
-
3
-
4
-
5
-
6
-
7
-
8
-
9
-
10
-
11
-
12
-
13
-
14
-
15
-
16
-
17
-
18
-
19
-
20
-
21
-
22
-
23
-
24
-
25
-
26
-
27
-
28
-
29
-
30
-
31
-
32
-
33
-
34
-
35
-
36
-
37
-
38
-
39
-
40
-
41
-
42
-
43
-
44
-
45
-
46
-
47
-
48
-
49
-
50
-
51
-
52
-
53
-
54
-
55
-
56
-
57
-
58
-
59
-
60
-
61
-
62
-
63
-
64
-
65
-
66
-
67
-
68
-
69
-
70
-
71
-
72
-
73
-
74
-
75
-
76
-
77
-
78
-
79
-
80
-
81
-
82
-
83
-
84
-
85
-
86
-
87
-
88
-
89
-
90
-
91
-
92
-
93
-
94
-
95
-
96
-
97
-
98
-
99
-
100
-
101
-
102
-
103
-
104
-
 105
105 -
 106
106 -
 107
107 -
 108
108 -
 109
109 -
 110
110 -
 111
111 -
 112
112 -
 113
113 -
 114
114 -
 115
115 -
116
-
117
-
118
-
119
-
120
-
121
-
122
-
123
-
124
-
125
-
126
-
127
-
128
-
129
-
130
-
131
-
132
-
133
-
134
-
135
-
136
-
137
-
138
-
139
-
140
-
141
-
142
-
143
-
144
-
145
-
146
-
147
-
148
-
149
-
150
-
151
-
152
-
153
-
154
-
155
-
156
-
157
-
158
-
159
-
160
-
161
-
162
-
163
-
164
-
165
-
166
-
167
-
168
-
169
-
170
-
171
-
172
-
173
-
174
-
175
-
176
-
177
-
178
-
179
-
180
-
181
-
182
-
183
-
184
-
185
-
186
-
187
-
188
-
189
-
190
-
191
-
192
-
193
-
194
-
195
-
196
-
197
-
198
-
199
-
200
-
201
-
202
-
203
-
204
-
205
-
206
-
207
-
208
 |
 |
