Panasonic P2 HD Camcorder Operating Instructions - Page 95
How to Use the User Data, With the AUTO W/B BAL switch flipped up
 |
View all Panasonic P2 HD Camcorder manuals
Add to My Manuals
Save this manual to your list of manuals |
Page 95 highlights
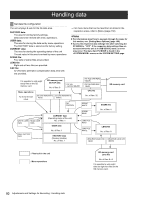
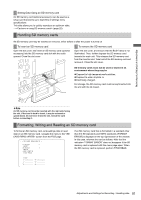
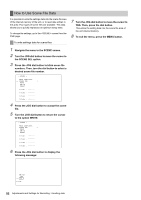
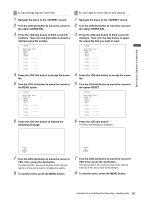
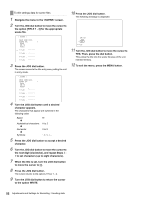
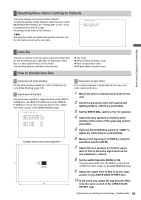
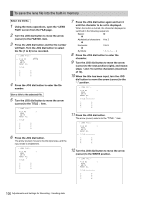
How to Use the User Data It is possible to transfer settings and other data to the user area of the internal memory of the unit. This data allows you to quickly reproduce an optimum setup state. To write data, go to the screen from the FILE page. To read the written user data, go to the screen from the FILE page. To write settings data in the user area 1 Navigate the menu to the screen. 2 Turn the JOG dial button to move the cursor to the option WRITE USER DATA. < INITIALIZE > READ FACTORY DATA # WRITE USER DATA 2 Turn the JOG dial button to move the cursor to the option READ USER DATA. < SCENE > # READ USER DATA SCENE SEL :1 READ WRITE RESET TITLE1 : ******** TITLE2 : ******** TITLE3 : ******** TITLE4 : ******** 3 Press the JOG dial button to display the following message: Adjustments and Settings for Recording READ? YES # NO 3 Press the JOG dial button. The following message is displayed. 4 Turn the JOG dial button to move the cursor to YES. Then, press the dial button. The data written in the user area of the internal memory of the unit is read to complete the setting. 5 To exit the menu, press the MENU button. WRITE? YES # NO 4 Turn the JOG dial button to move the cursor to YES. Then, press the dial button. This writes the settings data into the user area of the internal memory of the unit. 5 To exit the menu, press the MENU button. The set user data may be also read without navigating the menu. 1 Turn off the POWER switch. 2 Position the WHITE BAL switch at [PRST]. To read written user data 1 Navigate the menu to the screen. WHITE BAL Switch 3 With the AUTO W/B BAL switch flipped up, turn on the POWER switch. This resets all settings for USER menu options to their defaults. 95 Adjustments and Settings for Recording : Handling data
-
 1
1 -
2
-
3
-
4
-
5
-
6
-
7
-
8
-
9
-
10
-
11
-
12
-
13
-
14
-
15
-
16
-
17
-
18
-
19
-
20
-
21
-
22
-
23
-
24
-
25
-
26
-
27
-
28
-
29
-
30
-
31
-
32
-
33
-
34
-
35
-
36
-
37
-
38
-
39
-
40
-
41
-
42
-
43
-
44
-
45
-
46
-
47
-
48
-
49
-
50
-
51
-
52
-
53
-
54
-
55
-
56
-
57
-
58
-
59
-
60
-
61
-
62
-
63
-
64
-
65
-
66
-
67
-
68
-
69
-
70
-
71
-
72
-
73
-
74
-
75
-
76
-
77
-
78
-
79
-
80
-
81
-
82
-
83
-
84
-
85
-
86
-
87
-
88
-
89
-
 90
90 -
 91
91 -
 92
92 -
 93
93 -
 94
94 -
 95
95 -
 96
96 -
 97
97 -
 98
98 -
 99
99 -
 100
100 -
101
-
102
-
103
-
104
-
105
-
106
-
107
-
108
-
109
-
110
-
111
-
112
-
113
-
114
-
115
-
116
-
117
-
118
-
119
-
120
-
121
-
122
-
123
-
124
-
125
-
126
-
127
-
128
-
129
-
130
-
131
-
132
-
133
-
134
-
135
-
136
-
137
-
138
-
139
-
140
-
141
-
142
-
143
-
144
-
145
-
146
-
147
-
148
-
149
-
150
-
151
-
152
-
153
-
154
-
155
-
156
-
157
-
158
-
159
-
160
-
161
-
162
-
163
-
164
-
165
-
166
-
167
-
168
-
169
-
170
-
171
-
172
-
173
-
174
-
175
-
176
-
177
-
178
-
179
-
180
-
181
-
182
-
183
-
184
-
185
-
186
-
187
-
188
-
189
-
190
-
191
-
192
-
193
-
194
-
195
-
196
-
197
-
198
-
199
-
200
-
201
-
202
-
203
-
204
-
205
-
206
-
207
-
208
 |
 |
