Panasonic P2 HD Camcorder Operating Instructions - Page 81
INTERVAL REC/PRE, Iris, F value
 |
View all Panasonic P2 HD Camcorder manuals
Add to My Manuals
Save this manual to your list of manuals |
Page 81 highlights
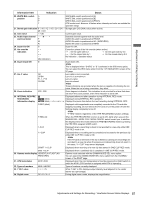
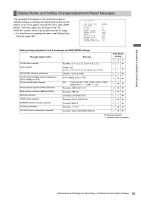
Adjustments and Settings for Recording Information Item Indication Status 20. WHITE BAL switch A WHITE BAL switch positioned at [A]. position B WHITE BAL switch positioned at [B]. P WHITE BAL switch positioned at [PRST]. T ATW mode is set. However it flashes when intensity and color are outside the operation range 21. Stored gain indication 6:/10:/12:/15:/20:/24:/ Storage gain (DS.GAIN) value (when active) 28:/34: 22. Gain value ¢¢dB Current gain value. 23. Audio input channel and level meter F W R Selected channel together with its audio level. AUDIO IN switch is positioned at FRONT. AUDIO IN switch is positioned at W.L.(WIRELESS) AUDIO IN switch is positioned at REAR. 24. Super iris ON S Super iris ON. 25. Iris override indication No indication) Correction phase of the iris override (when active) + + : On the open side by 1 +: On the open side by 0.5 - - : On the closed side by 1 -: On the closed side by 0.5 No indication : Standard status 26. Super black ON B Super black ON. ‹Note This is displayed when "S+IRIS" or "S" is selected in the IRIS menu option. You can select the IRIS menu option from the screen of the VF page. 27. Iris, F value NC OPEN F1.7 - F16 CLOSE Lens cable is not connected. Lens iris is at maximum. Lens iris value Lens iris closed. ‹Note These indications are provided when the lens is capable of indicating the iris value. When the iris is being overridden, they blink. 28. Zoom indication Z00 - Z99 Zoom degree is indicated. This indication is not provided for a lens that does not return the zoom position, even if the indication is set to ON. 29. INTERVAL REC/PRE [i] RECORDING information display Displayed before and after operation during INTERVAL REC mode. (blink) Displayed during INTERVAL REC operation. (blink) ¢¢h¢¢m/¢¢s Displays the pause time before the next recording during INTERVAL REC. P-REC (blink) Displayed until images/audio are completely recorded to the P2 card after stopping recording. Do not remove the P2 card or turn the power off until the flashing display completely turns off. ‹Note "P-REC" flashes regardless of the PRE RECORDING function settings. P-REC (lit) When the PRE RECORDING function is set to ON, lights when you pull the MARKER SEL, MODE CHK / MENU CANCEL switch toward you. In addition, this displays when the mode switches to PRE RECORDING mode by pressing the PRE REC assigned USER switch. 1-CLIP 1¢CLIP START 1¢CLIP Displayed when a recording is about to be recorded to a new clip while ONE CLIP REC mode is on. Displayed when a recording can be compiled and recorded to the previous clip while ONE CLIP REC mode is ON. ‹Note If the P2 card is removed or the clip is deleted, subsequent recordings are recorded to a new clip when the previous combined clip does not exist. In this case, "1¢CLIP" may remain displayed. Displayed when recording of a new clip has started in ONE CLIP REC mode. END 1-CLIP 30. Gamma mode display HD/SD/FLK1/FLK2/FLK3/ FREC/VREC 31. ATW lock status ATW LOCK 32. Types of markers 33. Y GET value MKR: A/B/OFF ¢¢¢.¢% 34. Digital zoom DZa2/a3/a4 Displayed when a combined clip is complete in ONE CLIP REC mode. Gamma mode selected with the GAMMA MODE SEL menu option. You can select the GAMMA MODE SEL menu option from the screen of the PAINT page. Displayed when the color temperature is fixed by pressing the USER switch to which the ATW LOCK function is assigned while ATW is operating. Types of markers currently displayed. While Y GET is ON, displays output intensity level adjacent to the center marker as a percentage. During digital zoom mode, displays the magnification. 81 Adjustments and Settings for Recording : Viewfinder Screen Status Displays
-
 1
1 -
2
-
3
-
4
-
5
-
6
-
7
-
8
-
9
-
10
-
11
-
12
-
13
-
14
-
15
-
16
-
17
-
18
-
19
-
20
-
21
-
22
-
23
-
24
-
25
-
26
-
27
-
28
-
29
-
30
-
31
-
32
-
33
-
34
-
35
-
36
-
37
-
38
-
39
-
40
-
41
-
42
-
43
-
44
-
45
-
46
-
47
-
48
-
49
-
50
-
51
-
52
-
53
-
54
-
55
-
56
-
57
-
58
-
59
-
60
-
61
-
62
-
63
-
64
-
65
-
66
-
67
-
68
-
69
-
70
-
71
-
72
-
73
-
74
-
75
-
 76
76 -
 77
77 -
 78
78 -
 79
79 -
 80
80 -
 81
81 -
 82
82 -
 83
83 -
 84
84 -
 85
85 -
 86
86 -
87
-
88
-
89
-
90
-
91
-
92
-
93
-
94
-
95
-
96
-
97
-
98
-
99
-
100
-
101
-
102
-
103
-
104
-
105
-
106
-
107
-
108
-
109
-
110
-
111
-
112
-
113
-
114
-
115
-
116
-
117
-
118
-
119
-
120
-
121
-
122
-
123
-
124
-
125
-
126
-
127
-
128
-
129
-
130
-
131
-
132
-
133
-
134
-
135
-
136
-
137
-
138
-
139
-
140
-
141
-
142
-
143
-
144
-
145
-
146
-
147
-
148
-
149
-
150
-
151
-
152
-
153
-
154
-
155
-
156
-
157
-
158
-
159
-
160
-
161
-
162
-
163
-
164
-
165
-
166
-
167
-
168
-
169
-
170
-
171
-
172
-
173
-
174
-
175
-
176
-
177
-
178
-
179
-
180
-
181
-
182
-
183
-
184
-
185
-
186
-
187
-
188
-
189
-
190
-
191
-
192
-
193
-
194
-
195
-
196
-
197
-
198
-
199
-
200
-
201
-
202
-
203
-
204
-
205
-
206
-
207
-
208
 |
 |
