Panasonic P2 HD Camcorder Operating Instructions - Page 24
SDI OUT connector
 |
View all Panasonic P2 HD Camcorder manuals
Add to My Manuals
Save this manual to your list of manuals |
Page 24 highlights
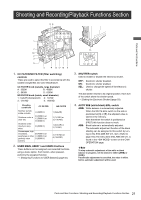
28 27 25 24 26 23 29 30 23. GENLOCK IN connector When GENLOCK is set on the camera, or when the time code is externally locked, reference signals are input. Also, you can check the return video signal on the viewfinder screen by inputting an HD-Y signal, and selecting HD-Y with the RETURN SIGNAL menu option. You can select the RETURN SIGNAL menu option from the screen of the SYSTEM SETTING page. > [Setting External Reference Signal and GENLOCK] (page 61)] 24. SDI IN connector You can input HD/SD SDI signals. By selecting "SDI" with the REC SIGNAL menu option, you can record signals from this input connector. You can select the REC SIGNAL menu option from the screen of the SYSTEM SETTING page. Also, you can set GENLOCK on the menu based on this input signal. > [Setting External Reference Signal and GENLOCK] (page 61)] ‹Note When inputting HD SDI signals use a cable above 5C-FB. 25. SDI OUT connector This is the dedicated SDI output connector. The same signal format as the SYSTEM MODE is output. Down convert and up convert are not supported. You can independently set character superimposition with the 26.MON OUT (monitor output) connector. > [Settings of signals output from SDI OUT connector] (page 88) ‹Note When inputting HD SDI signals use a cable above 5C-FB. 26. MON OUT (monitor output) connector This is the video output connector for the monitor. According to the MONITOR OUT MODE menu option, images independent of SDI OUT can be output. Also, with the menu settings, HD-SDI or down converted SDSDI or VBS can be selected. Up convert is not supported. You can select the MONITOR OUT MODE menu option from the screen of the SYSTEM SETTING page. You can set character superimposition with the 9.MON OUT CHARACTER switch switch separately from the 25.SDI OUT connector. > [Settings of signals output from MON OUT connector] (page 89). ‹Note When inputting HD SDI signals use a cable above 5C-FB. 27.REC button Pressing this button starts recording, and pressing again stops recording. This button has the same function as 6.REC button and the VTR button at the lens. It may be disabled with 28.REC protection button. 28. REC protection button This button disables 27.REC button on the handle. ON: The REC button is enabled. OFF: The REC button is disabled. 29. USB 2.0 connector (HOST) 30. USB 2.0 connector (DEVICE) A USB 2.0 cable is connected here. When the menu option PC MODE is set to "ON", data can be transferred via USB 2.0. During such data transfer, recording, playback or operations of clips is permitted. The menu item PC MODE is found in the screen on the SYSTEM SETTING page. > [Connection with external devices using the USB 2.0 port] (page 136) 24 Parts and their Functions: Shooting and Recording/Playback Functions Section
-
 1
1 -
2
-
3
-
4
-
5
-
6
-
7
-
8
-
9
-
10
-
11
-
12
-
13
-
14
-
15
-
16
-
17
-
18
-
 19
19 -
 20
20 -
 21
21 -
 22
22 -
 23
23 -
 24
24 -
 25
25 -
 26
26 -
 27
27 -
 28
28 -
 29
29 -
30
-
31
-
32
-
33
-
34
-
35
-
36
-
37
-
38
-
39
-
40
-
41
-
42
-
43
-
44
-
45
-
46
-
47
-
48
-
49
-
50
-
51
-
52
-
53
-
54
-
55
-
56
-
57
-
58
-
59
-
60
-
61
-
62
-
63
-
64
-
65
-
66
-
67
-
68
-
69
-
70
-
71
-
72
-
73
-
74
-
75
-
76
-
77
-
78
-
79
-
80
-
81
-
82
-
83
-
84
-
85
-
86
-
87
-
88
-
89
-
90
-
91
-
92
-
93
-
94
-
95
-
96
-
97
-
98
-
99
-
100
-
101
-
102
-
103
-
104
-
105
-
106
-
107
-
108
-
109
-
110
-
111
-
112
-
113
-
114
-
115
-
116
-
117
-
118
-
119
-
120
-
121
-
122
-
123
-
124
-
125
-
126
-
127
-
128
-
129
-
130
-
131
-
132
-
133
-
134
-
135
-
136
-
137
-
138
-
139
-
140
-
141
-
142
-
143
-
144
-
145
-
146
-
147
-
148
-
149
-
150
-
151
-
152
-
153
-
154
-
155
-
156
-
157
-
158
-
159
-
160
-
161
-
162
-
163
-
164
-
165
-
166
-
167
-
168
-
169
-
170
-
171
-
172
-
173
-
174
-
175
-
176
-
177
-
178
-
179
-
180
-
181
-
182
-
183
-
184
-
185
-
186
-
187
-
188
-
189
-
190
-
191
-
192
-
193
-
194
-
195
-
196
-
197
-
198
-
199
-
200
-
201
-
202
-
203
-
204
-
205
-
206
-
207
-
208
 |
 |
