Panasonic P2 HD Camcorder Operating Instructions - Page 103
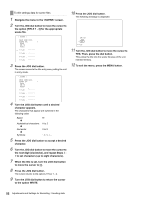
Turn the JOG dial button to move the arrow, cursor to the CARD FILE SELECT item.
 |
View all Panasonic P2 HD Camcorder manuals
Add to My Manuals
Save this manual to your list of manuals |
Page 103 highlights
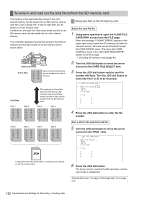
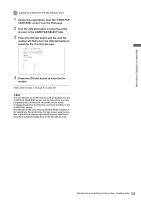
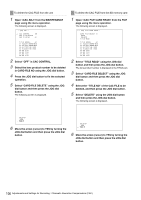
Adjustments and Settings for Recording Loading lens files from the SD memory card 1 Using menu operations, open the screen from the FILE page. 2 Turn the JOG dial button to move the arrow (cursor) to the CARD FILE SELECT item. 3 Press the JOG dial button and the card file number will flash. Turn the JOG dial button to select the file (1 to 8) to be read. < LENS FILE CARD R/W > # CARD FILE SELECT :1 READ WRITE TITLE READ TITLE: 1: 5: 2: 6: 3: 7: 4: 8: 4 Press the JOG dial button to enter the file number. Now perform steps 5 through 8 on page 101. ‹Note The card file titles on the SD memory card are displayed on the screen, but the titles of the lens files contained in the card files are not shown on this screen. To display these titles, load the files, and check the titles on the screen. The lens files in the unit's internal memory will be rewritten as the loaded lens files at this time. For this reason, save the lens files in the internal memory onto the SD memory card first to back them up before loading them on the SD memory card. Adjustments and Settings for Recording : Handling data 103
-
 1
1 -
2
-
3
-
4
-
5
-
6
-
7
-
8
-
9
-
10
-
11
-
12
-
13
-
14
-
15
-
16
-
17
-
18
-
19
-
20
-
21
-
22
-
23
-
24
-
25
-
26
-
27
-
28
-
29
-
30
-
31
-
32
-
33
-
34
-
35
-
36
-
37
-
38
-
39
-
40
-
41
-
42
-
43
-
44
-
45
-
46
-
47
-
48
-
49
-
50
-
51
-
52
-
53
-
54
-
55
-
56
-
57
-
58
-
59
-
60
-
61
-
62
-
63
-
64
-
65
-
66
-
67
-
68
-
69
-
70
-
71
-
72
-
73
-
74
-
75
-
76
-
77
-
78
-
79
-
80
-
81
-
82
-
83
-
84
-
85
-
86
-
87
-
88
-
89
-
90
-
91
-
92
-
93
-
94
-
95
-
96
-
97
-
 98
98 -
 99
99 -
 100
100 -
 101
101 -
 102
102 -
 103
103 -
 104
104 -
 105
105 -
 106
106 -
 107
107 -
 108
108 -
109
-
110
-
111
-
112
-
113
-
114
-
115
-
116
-
117
-
118
-
119
-
120
-
121
-
122
-
123
-
124
-
125
-
126
-
127
-
128
-
129
-
130
-
131
-
132
-
133
-
134
-
135
-
136
-
137
-
138
-
139
-
140
-
141
-
142
-
143
-
144
-
145
-
146
-
147
-
148
-
149
-
150
-
151
-
152
-
153
-
154
-
155
-
156
-
157
-
158
-
159
-
160
-
161
-
162
-
163
-
164
-
165
-
166
-
167
-
168
-
169
-
170
-
171
-
172
-
173
-
174
-
175
-
176
-
177
-
178
-
179
-
180
-
181
-
182
-
183
-
184
-
185
-
186
-
187
-
188
-
189
-
190
-
191
-
192
-
193
-
194
-
195
-
196
-
197
-
198
-
199
-
200
-
201
-
202
-
203
-
204
-
205
-
206
-
207
-
208
 |
 |
