Ricoh Aficio MP 6001 SP Operating Instructions - Page 91
When the Data In Indicator Does Not Light Up or Flash
 |
View all Ricoh Aficio MP 6001 SP manuals
Add to My Manuals
Save this manual to your list of manuals |
Page 91 highlights
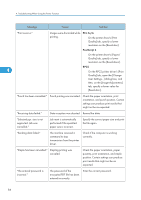
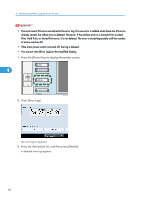
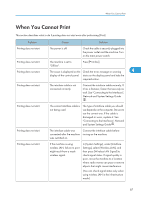
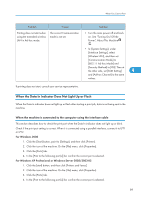
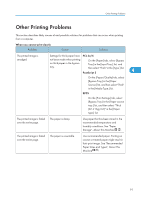
When You Cannot Print Problem Cause Solution Printing does not start when using the extended wireless LAN in Ad-hoc mode. The correct Communication mode is not set. • Turn the main power off and back on. See "Turning On/Off the Power", About This Machine . • In [System Settings], under [Interface Settings], select [Wireless LAN], and then set [Communication Mode] to [802.11 Ad-hoc Mode] and [Security Method] to [Off]. Then at the other side, set [SSID Setting] 4 and [Ad-hoc Channel] to the same values. If printing does not start, consult your service representative. When the Data In Indicator Does Not Light Up or Flash When the Data In indicator does not light up or flash after starting a print job, data is not being sent to the machine. When the machine is connected to the computer using the interface cable This section describes how to check the print port when the Data In indicator does not light up or blink. Check if the print port setting is correct. When it is connected using a parallel interface, connect it to LPT1 or LPT2. For Windows 2000 1. Click the [Start] button, point to [Settings], and then click [Printers]. 2. Click the icon of the machine. On the [File] menu, click [Properties]. 3. Click the [Ports] tab. 4. In the [Print to the following port(s)] list, confirm the correct port is selected. For Windows XP Professional or Windows Server 2003/2003 R2 1. Click the [start] button, and then click [Printers and Faxes]. 2. Click the icon of the machine. On the [File] menu, click [Properties]. 3. Click the [Ports] tab. 4. In the [Print to the following port(s)] list, confirm the correct port is selected. 89
-
 1
1 -
2
-
3
-
4
-
5
-
6
-
7
-
8
-
9
-
10
-
11
-
12
-
13
-
14
-
15
-
16
-
17
-
18
-
19
-
20
-
21
-
22
-
23
-
24
-
25
-
26
-
27
-
28
-
29
-
30
-
31
-
32
-
33
-
34
-
35
-
36
-
37
-
38
-
39
-
40
-
41
-
42
-
43
-
44
-
45
-
46
-
47
-
48
-
49
-
50
-
51
-
52
-
53
-
54
-
55
-
56
-
57
-
58
-
59
-
60
-
61
-
62
-
63
-
64
-
65
-
66
-
67
-
68
-
69
-
70
-
71
-
72
-
73
-
74
-
75
-
76
-
77
-
78
-
79
-
80
-
81
-
82
-
83
-
84
-
85
-
 86
86 -
 87
87 -
 88
88 -
 89
89 -
 90
90 -
 91
91 -
 92
92 -
 93
93 -
 94
94 -
 95
95 -
 96
96 -
97
-
98
-
99
-
100
-
101
-
102
-
103
-
104
-
105
-
106
-
107
-
108
-
109
-
110
-
111
-
112
-
113
-
114
-
115
-
116
-
117
-
118
-
119
-
120
-
121
-
122
-
123
-
124
-
125
-
126
-
127
-
128
-
129
-
130
-
131
-
132
-
133
-
134
-
135
-
136
-
137
-
138
-
139
-
140
-
141
-
142
-
143
-
144
-
145
-
146
-
147
-
148
-
149
-
150
-
151
-
152
-
153
-
154
-
155
-
156
-
157
-
158
-
159
-
160
 |
 |