Samsung SCH-R261 User Manual (user Manual) (ver.1.0) (English(north America)) - Page 50
Rename a Group, Add a New Group, Deleting a Contacts Entry
 |
View all Samsung SCH-R261 manuals
Add to My Manuals
Save this manual to your list of manuals |
Page 50 highlights
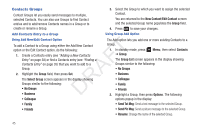
Rename a Group 4. When you have completed entering the new Group name, The Rename option lets you change the name any of the Groups, except No Group. 1. In standby mode, press Menu, then select Contacts ➔ Group. The Group List screen appears in the display. press Save. "Group Saved" appears in the display followed by the Group List screen showing your new Group. Erase a Group 2. Highlight the Group name other than No Group that you The Erase option lets you delete a Group, thus freeing you to wish to change, then press Options ➔ Rename. reassign the Contacts formerly in the Group. The Rename Group screen appears in the display. 3. Enter changes to the group name using the keypad. (For T more information, refer to "Entering Text" on page 31.) 4. When you have completed your changes to the Group F name, press Save. "Group Renamed" appears in the display followed by the A Group List screen showing your renamed Group. Add a New Group R The New option lets you add Groups. 1. In standby mode, press Menu, then select Contacts D ➔ Group. The Group List screen appears in the display. 1. In standby mode, press Menu, then select Contacts ➔ Group. The Group List screen appears in the display. 2. Highlight the Group that you wish to delete, press Options, then select Erase. You are prompted to confirm the Group erasure. 3. To confirm erasure of the Group, press Yes. To retain the Group, press No. Deleting a Contacts Entry 1. Find the Contacts entry you want to delete. (For more information, refer to "Finding a Contacts Entry" on page 35.) 2. Press New. The New Group screen appears in the display. 3. Enter a new group name using the keypad. (For more information, refer to "Entering Text" on page 31.) 2. Highlight the desired entry, press Options, then select Erase. The phone prompts you to confirm the erasure. 3. To confirm erasure of the selected Contact, press Yes. To retain the Contact, press No. 47
-
 1
1 -
2
-
3
-
4
-
5
-
6
-
7
-
8
-
9
-
10
-
11
-
12
-
13
-
14
-
15
-
16
-
17
-
18
-
19
-
20
-
21
-
22
-
23
-
24
-
25
-
26
-
27
-
28
-
29
-
30
-
31
-
32
-
33
-
34
-
35
-
36
-
37
-
38
-
39
-
40
-
41
-
42
-
43
-
44
-
 45
45 -
 46
46 -
 47
47 -
 48
48 -
 49
49 -
 50
50 -
 51
51 -
 52
52 -
 53
53 -
 54
54 -
 55
55 -
56
-
57
-
58
-
59
-
60
-
61
-
62
-
63
-
64
-
65
-
66
-
67
-
68
-
69
-
70
-
71
-
72
-
73
-
74
-
75
-
76
-
77
-
78
-
79
-
80
-
81
-
82
-
83
-
84
-
85
-
86
-
87
-
88
-
89
-
90
-
91
-
92
-
93
-
94
-
95
-
96
-
97
-
98
-
99
-
100
-
101
-
102
-
103
-
104
-
105
-
106
-
107
-
108
-
109
-
110
-
111
-
112
-
113
-
114
-
115
-
116
-
117
-
118
-
119
-
120
-
121
-
122
-
123
-
124
-
125
-
126
-
127
-
128
-
129
-
130
-
131
-
132
-
133
-
134
-
135
-
136
-
137
-
138
-
139
-
140
-
141
-
142
-
143
-
144
-
145
-
146
-
147
-
148
-
149
-
150
-
151
 |
 |
