Samsung SCH-R261 User Manual (user Manual) (ver.1.0) (English(north America)) - Page 76
Camera Options, Shot Type
 |
View all Samsung SCH-R261 manuals
Add to My Manuals
Save this manual to your list of manuals |
Page 76 highlights
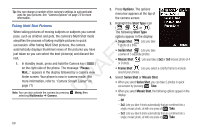
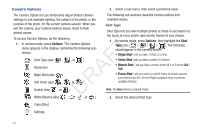
Camera Options 2. Select a sub-menu, then select a preferred value. The Camera Options let you temporarily adjust default camera The following sub-sections describe camera options and settings to suit available lighting, the subject of the photo, or the available values. purpose of the photo, for the current camera session. When you Shot Type exit the camera, your Camera Options values revert to their default values. Shot Type lets you take multiple photos or shots in succession at the touch of a key and/or add colorful frames to your photos. To access Camera Options, do the following: 1. In camera mode, press Options. The Camera Options menu appears in the display, containing the following submenus: T Shot Type (also , , or ) F Resolution A Night Shot (also ) Self Timer (also , , or ) DR Quality (also , or ) 1. In camera mode, press Options, then highlight the Shot Type icon ( / / / ). The following values appear in the camera screen: • Single Shot: Lets you take 1 photo at a time. • Series Shot: Lets you take a series of 5 photos. • Mosaic Shot: Lets you take a mosaic photo of 4 or 9 shots (2x2 / 3x3). • Frame Shot: Lets you select a colorful frame to include around your photos (use the Left and Right navigation keys to preview available frames). Note: The None frame is a blank frame. White Balance (also , , , or ) 2. Select the desired Shot Type. Color Effect Settings 73
-
 1
1 -
2
-
3
-
4
-
5
-
6
-
7
-
8
-
9
-
10
-
11
-
12
-
13
-
14
-
15
-
16
-
17
-
18
-
19
-
20
-
21
-
22
-
23
-
24
-
25
-
26
-
27
-
28
-
29
-
30
-
31
-
32
-
33
-
34
-
35
-
36
-
37
-
38
-
39
-
40
-
41
-
42
-
43
-
44
-
45
-
46
-
47
-
48
-
49
-
50
-
51
-
52
-
53
-
54
-
55
-
56
-
57
-
58
-
59
-
60
-
61
-
62
-
63
-
64
-
65
-
66
-
67
-
68
-
69
-
70
-
 71
71 -
 72
72 -
 73
73 -
 74
74 -
 75
75 -
 76
76 -
 77
77 -
 78
78 -
 79
79 -
 80
80 -
 81
81 -
82
-
83
-
84
-
85
-
86
-
87
-
88
-
89
-
90
-
91
-
92
-
93
-
94
-
95
-
96
-
97
-
98
-
99
-
100
-
101
-
102
-
103
-
104
-
105
-
106
-
107
-
108
-
109
-
110
-
111
-
112
-
113
-
114
-
115
-
116
-
117
-
118
-
119
-
120
-
121
-
122
-
123
-
124
-
125
-
126
-
127
-
128
-
129
-
130
-
131
-
132
-
133
-
134
-
135
-
136
-
137
-
138
-
139
-
140
-
141
-
142
-
143
-
144
-
145
-
146
-
147
-
148
-
149
-
150
-
151
 |
 |
