Seagate Mirra Personal Server User Guide (Windows) - Page 52
Adjusting Network Settings, Quick Setup, Mirra Tasks, Status, Con
 |
View all Seagate Mirra Personal Server manuals
Add to My Manuals
Save this manual to your list of manuals |
Page 52 highlights
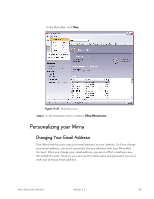
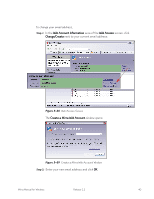
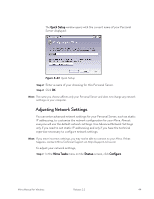
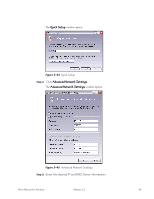
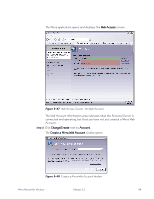
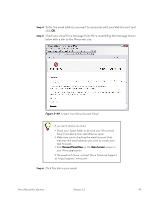
The Quick Setup window opens with the current name of your Personal Server displayed: Figure 3~43 Quick Setup Step 2: Enter a name of your choosing for this Personal Server. Step 3: Click OK. Note: The name you choose affects only your Personal Server and does not change any network settings on your computer. Adjusting Network Settings You can enter advanced network settings for your Personal Server, such as static IP addressing, to customize the network configuration for your Mirra. Almost everyone will use the default network settings. Use Advanced Network Settings only if you need to set static IP addressing and only if you have the technical expertise necessary to configure network settings. Note: If you enter incorrect settings, you may not be able to connect to your Mirra. If that happens, contact Mirra Technical Support at http://support.mirra.com. To adjust your network settings, Step 1: In the Mirra Tasks menu on the Status screen, click Configure. Mirra Manual for Windows Release 2.2 44
-
 1
1 -
2
-
3
-
4
-
5
-
6
-
7
-
8
-
9
-
10
-
11
-
12
-
13
-
14
-
15
-
16
-
17
-
18
-
19
-
20
-
21
-
22
-
23
-
24
-
25
-
26
-
27
-
28
-
29
-
30
-
31
-
32
-
33
-
34
-
35
-
36
-
37
-
38
-
39
-
40
-
41
-
42
-
43
-
44
-
45
-
46
-
 47
47 -
 48
48 -
 49
49 -
 50
50 -
 51
51 -
 52
52 -
 53
53 -
 54
54 -
 55
55 -
 56
56 -
 57
57 -
58
-
59
-
60
-
61
-
62
-
63
-
64
-
65
-
66
-
67
-
68
-
69
-
70
-
71
-
72
-
73
-
74
-
75
-
76
-
77
-
78
-
79
-
80
-
81
-
82
-
83
-
84
-
85
-
86
-
87
-
88
-
89
-
90
-
91
-
92
-
93
-
94
-
95
-
96
-
97
-
98
-
99
-
100
-
101
-
102
-
103
-
104
-
105
-
106
-
107
-
108
-
109
-
110
-
111
-
112
-
113
-
114
-
115
-
116
-
117
-
118
-
119
-
120
-
121
-
122
-
123
-
124
-
125
-
126
-
127
-
128
-
129
-
130
-
131
-
132
-
133
-
134
-
135
-
136
-
137
-
138
-
139
-
140
-
141
-
142
-
143
-
144
-
145
-
146
-
147
-
148
-
149
 |
 |
