Seagate Mirra Personal Server User Guide (Windows) - Page 96
Restoring a Selected Version of a File, Notes on Backing Up and Restoring Files and Folders
 |
View all Seagate Mirra Personal Server manuals
Add to My Manuals
Save this manual to your list of manuals |
Page 96 highlights
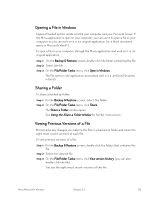
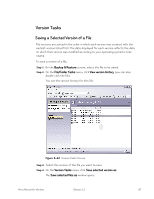
Step 5: Rename the file if you wish and select the location at which you want it saved. Step 6: Click Save. The file is saved at the selected location and now appears in both its original and its new locations. Restoring a Selected Version of a File Since Mirra stores the eight most recent versions of each file, you can restore an earlier version to your computer. File versions are sorted in the order in which each version was created, with the earliest version listed first. The date displayed for each version reflects the date on which that version was modified according to your operating system's time stamp. Note: Before you can restore a version of a deleted file, you must undelete it. To restore an earlier version of a file, Step 1: On the Backup & Restore screen, select the file to be restored. Step 2: On the File/Folder Tasks menu, click View version history (you can also double-click the file). Step 3: On the Version Tasks menu, click Restore selected version. The selected version of the file is restored to its original location on your computer. Notes on Backing Up and Restoring Files and Folders • If you interrupt the backup of your files by turning off your computer or disconnecting from your network, Mirra remembers where you left off and picks up from there when you turn your computer back on or reconnect to your network. • Laptop users: Even when you disconnect your computer from the network, the Mirra software continues to track changes and automatically synchronizes the most recent version of each of your files to your Personal Server when you reconnect to the network. Mirra Manual for Windows Release 2.2 88
-
 1
1 -
2
-
3
-
4
-
5
-
6
-
7
-
8
-
9
-
10
-
11
-
12
-
13
-
14
-
15
-
16
-
17
-
18
-
19
-
20
-
21
-
22
-
23
-
24
-
25
-
26
-
27
-
28
-
29
-
30
-
31
-
32
-
33
-
34
-
35
-
36
-
37
-
38
-
39
-
40
-
41
-
42
-
43
-
44
-
45
-
46
-
47
-
48
-
49
-
50
-
51
-
52
-
53
-
54
-
55
-
56
-
57
-
58
-
59
-
60
-
61
-
62
-
63
-
64
-
65
-
66
-
67
-
68
-
69
-
70
-
71
-
72
-
73
-
74
-
75
-
76
-
77
-
78
-
79
-
80
-
81
-
82
-
83
-
84
-
85
-
86
-
87
-
88
-
89
-
90
-
 91
91 -
 92
92 -
 93
93 -
 94
94 -
 95
95 -
 96
96 -
 97
97 -
 98
98 -
 99
99 -
 100
100 -
 101
101 -
102
-
103
-
104
-
105
-
106
-
107
-
108
-
109
-
110
-
111
-
112
-
113
-
114
-
115
-
116
-
117
-
118
-
119
-
120
-
121
-
122
-
123
-
124
-
125
-
126
-
127
-
128
-
129
-
130
-
131
-
132
-
133
-
134
-
135
-
136
-
137
-
138
-
139
-
140
-
141
-
142
-
143
-
144
-
145
-
146
-
147
-
148
-
149
 |
 |
