Yamaha SY85 Owner's Manual (feature Reference) (image) - Page 196
Clock Move
 |
View all Yamaha SY85 manuals
Add to My Manuals
Save this manual to your list of manuals |
Page 196 highlights
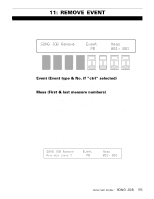
12: CLOCK MOVE [SONG] → [A]~[H] → [SONG JOB] → [MENU] → 12:Clock Move → [ENTER/YES] Moves all notes and events in the specified track and range of measures forward or backward by the specified number of "clocks." This job is not available when the rhythm track (track 9) is selected. SONG`JOB`Clock`Move```````Meas`````Clock 001ø`001`+000` F1 F2 F3 F4 F5 F6 F7 F8 CS1 CS2 CS3 CS4 CS5 CS6 CS7 CS8 Meas (First & last measure numbers) Range: 001 ... 999 Controls: [CS6], [CS7], [-1] [+1], Dial Clock Range: -999 ... +999 Controls: [CS8], [-1] [+1], Dial Use the GROUP [A] through [H] keys to select the track on which the clock move operation is to be performed (A = track1, B = track 2, and so on). The LED of the selected track will glow red while the LEDs of all other tracks containing data glow green. Use [CS6] and [CS7] to specify the first and last measure numbers in the range of measures over which you want to shift the timing of note and event data. Use [CS8] to set the number of clocks by which the data will be moved forward or backward. Minus (-) values move the data backward (toward the beginning of the song) while plus (+) values move the data forward (toward the end of the song). Each "clock" is equal to 1/48th of a quarter note. Press [ENTER/YES] to begin the clock move procedure. The following confirmation display will appear: SONG`JOB`Clock`Move```````Meas`````Clock Are`you`sure 001ø`001`+000` Press [ENTER/YES] again to confirm that you want to go ahead with the clock move operation, or press [EXIT/NO] to cancel. When the data has been moved, "Completed!" will appear briefly on the display. SONG EDIT MODE / SONG JOB 195
-
 1
1 -
2
-
3
-
4
-
5
-
6
-
7
-
8
-
9
-
10
-
11
-
12
-
13
-
14
-
15
-
16
-
17
-
18
-
19
-
20
-
21
-
22
-
23
-
24
-
25
-
26
-
27
-
28
-
29
-
30
-
31
-
32
-
33
-
34
-
35
-
36
-
37
-
38
-
39
-
40
-
41
-
42
-
43
-
44
-
45
-
46
-
47
-
48
-
49
-
50
-
51
-
52
-
53
-
54
-
55
-
56
-
57
-
58
-
59
-
60
-
61
-
62
-
63
-
64
-
65
-
66
-
67
-
68
-
69
-
70
-
71
-
72
-
73
-
74
-
75
-
76
-
77
-
78
-
79
-
80
-
81
-
82
-
83
-
84
-
85
-
86
-
87
-
88
-
89
-
90
-
91
-
92
-
93
-
94
-
95
-
96
-
97
-
98
-
99
-
100
-
101
-
102
-
103
-
104
-
105
-
106
-
107
-
108
-
109
-
110
-
111
-
112
-
113
-
114
-
115
-
116
-
117
-
118
-
119
-
120
-
121
-
122
-
123
-
124
-
125
-
126
-
127
-
128
-
129
-
130
-
131
-
132
-
133
-
134
-
135
-
136
-
137
-
138
-
139
-
140
-
141
-
142
-
143
-
144
-
145
-
146
-
147
-
148
-
149
-
150
-
151
-
152
-
153
-
154
-
155
-
156
-
157
-
158
-
159
-
160
-
161
-
162
-
163
-
164
-
165
-
166
-
167
-
168
-
169
-
170
-
171
-
172
-
173
-
174
-
175
-
176
-
177
-
178
-
179
-
180
-
181
-
182
-
183
-
184
-
185
-
186
-
187
-
188
-
189
-
190
-
 191
191 -
 192
192 -
 193
193 -
 194
194 -
 195
195 -
 196
196 -
 197
197 -
 198
198 -
 199
199 -
 200
200 -
 201
201 -
202
-
203
-
204
-
205
-
206
-
207
-
208
-
209
-
210
-
211
-
212
-
213
-
214
-
215
-
216
-
217
-
218
-
219
-
220
-
221
-
222
-
223
-
224
-
225
-
226
-
227
-
228
-
229
-
230
-
231
-
232
-
233
-
234
-
235
-
236
-
237
-
238
-
239
-
240
-
241
-
242
-
243
-
244
-
245
-
246
-
247
-
248
-
249
-
250
-
251
-
252
-
253
-
254
-
255
-
256
-
257
-
258
-
259
-
260
-
261
-
262
-
263
-
264
-
265
-
266
-
267
-
268
-
269
-
270
-
271
-
272
-
273
-
274
-
275
-
276
-
277
-
278
-
279
-
280
-
281
-
282
-
283
-
284
-
285
-
286
-
287
-
288
-
289
-
290
-
291
-
292
-
293
-
294
-
295
-
296
-
297
-
298
-
299
-
300
-
301
-
302
-
303
-
304
-
305
-
306
-
307
-
308
-
309
-
310
-
311
-
312
-
313
-
314
-
315
-
316
-
317
-
318
-
319
-
320
-
321
-
322
-
323
-
324
-
325
-
326
-
327
-
328
-
329
-
330
-
331
 |
 |
