Belkin F5D7632-4_V3000 User Manual - Page 13
Running the Setup Wizard
 |
View all Belkin F5D7632-4_V3000 manuals
Add to My Manuals
Save this manual to your list of manuals |
Page 13 highlights
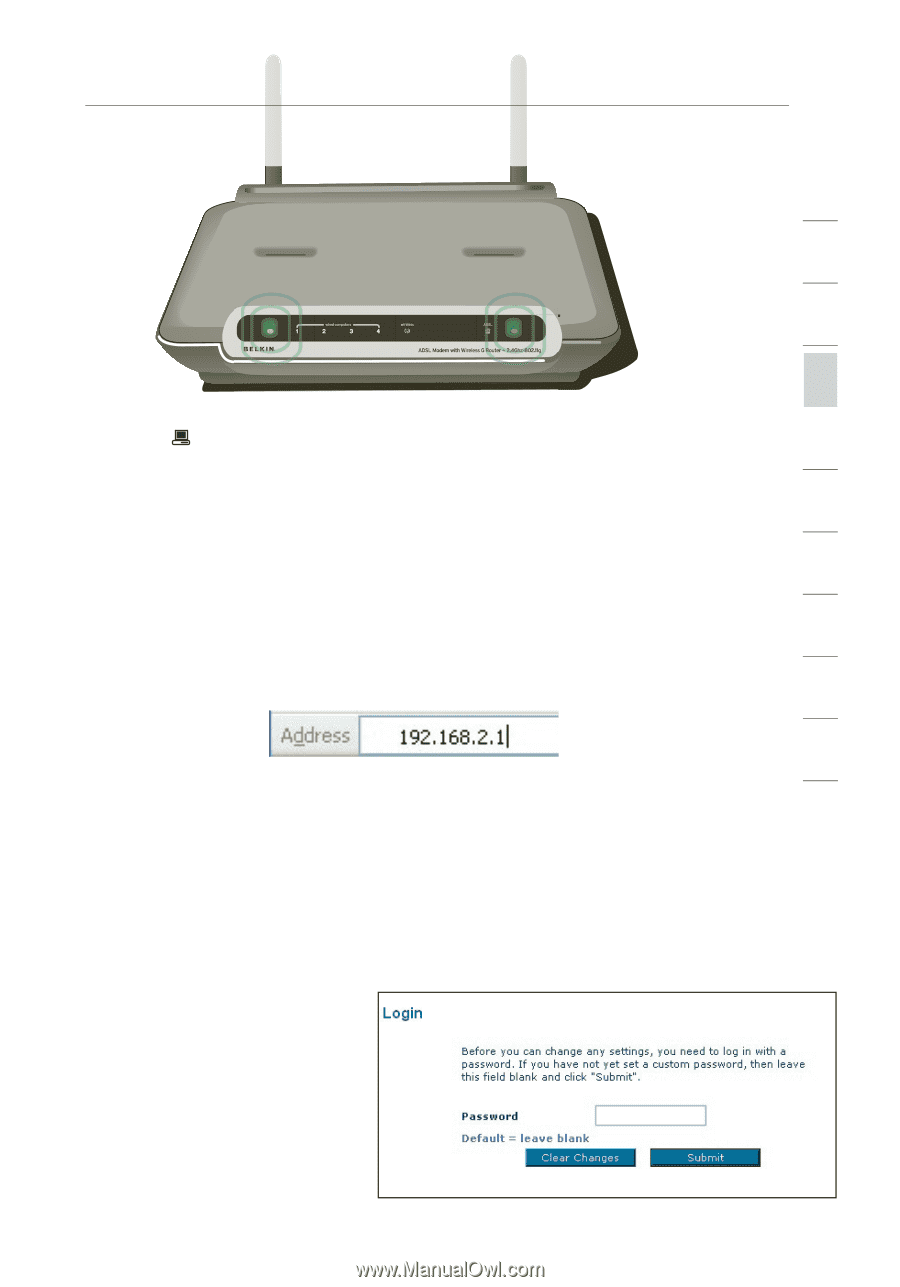
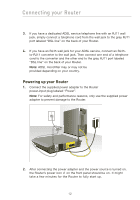
Connecting your Router section 1 2 3 4 3. Turn on your computers. After your computers boot up, the LAN status LED on the front of the Router will be on for each port to which a 5 wired computer is connected. These lights show you the connection and activity status. Now you are ready to configure the Router for ADSL connection. 6 Running the Setup Wizard 7 1. You can access the web-based management user interface of the Router using the Internet browser on a computer connected to the 8 Router. Type "192.168.2.1" (do not type in anything else such as "http://" or "www") in your browser's address bar. Then press the "Enter" key. 9 10 Note: It is strongly recommended that you use a computer physically connected to the Router with an RJ45 cable for initial setup. Using a wirelessly connected computer for initial setup is not recommended. 2. The following screen will appear in your browser to prompt you to login. The Router shi ps with no password entered. In the login screen, leave the password blank and click the "Submit" button to log in. Note: It is strongly recommended that you change the password to your own, for increased security. Please read the following section entitled "Manually configuring your Router", for details on how to change your password and to reference other security features. 13
-
 1
1 -
2
-
3
-
4
-
5
-
6
-
7
-
 8
8 -
 9
9 -
 10
10 -
 11
11 -
 12
12 -
 13
13 -
 14
14 -
 15
15 -
 16
16 -
 17
17 -
 18
18 -
19
-
20
-
21
-
22
-
23
-
24
-
25
-
26
-
27
-
28
-
29
-
30
-
31
-
32
-
33
-
34
-
35
-
36
-
37
-
38
-
39
-
40
-
41
-
42
-
43
-
44
-
45
-
46
-
47
-
48
-
49
-
50
-
51
-
52
-
53
-
54
-
55
-
56
-
57
-
58
-
59
-
60
-
61
-
62
-
63
-
64
-
65
-
66
-
67
-
68
-
69
-
70
-
71
-
72
-
73
-
74
-
75
-
76
-
77
-
78
-
79
-
80
-
81
-
82
-
83
-
84
-
85
-
86
-
87
-
88
-
89
-
90
-
91
-
92
-
93
-
94
-
95
-
96
-
97
-
98
-
99
-
100
-
101
-
102
-
103
-
104
-
105
-
106
-
107
-
108
 |
 |