Belkin F5D7632-4_V3000 User Manual - Page 89
Enabling WPA-PSK no server
 |
View all Belkin F5D7632-4_V3000 manuals
Add to My Manuals
Save this manual to your list of manuals |
Page 89 highlights
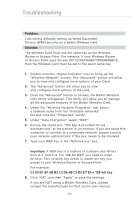
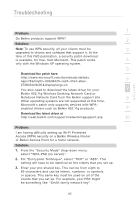
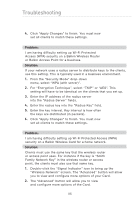
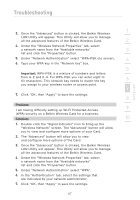
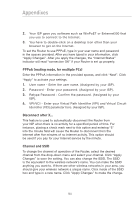
Troubleshooting 1 Enabling WPA-PSK (no server) 1. Under Windows XP, click "Start > Control Panel > Network Connections". 2 2. Right-clicking on the "Wireless Networks" tab will display the following screen. Ensure the "Use Windows to 3 configure my wireless network settings" box is checked. 3. Under the "Wireless Networks" tab, click the "Configure" 4 button, and you will see the following screen. 4. For a home or small business user, select "WPA- 5 PSK" under "Network Administration". 6 Note: Select WPA (with radius server) if you are using this computer to connect to a corporate network that supports an authentication server such as a radius server. Please 7 consult your network administrator for further information. 8 5. Select "TKIP" or "AES" under "Date Encryption". This setting will have to be identical to the wireless 9 router or access point that you set up. 6. Type in your encryption key in the "Network Key" box. 10 Important: Enter your pre-shared key. This can be from eight to 63 characters and can be letters, numbers, or symbols. This same key must be used on all of the clients that you set up. 7. Click "OK" to apply settings. section 89
-
 1
1 -
2
-
3
-
4
-
5
-
6
-
7
-
8
-
9
-
10
-
11
-
12
-
13
-
14
-
15
-
16
-
17
-
18
-
19
-
20
-
21
-
22
-
23
-
24
-
25
-
26
-
27
-
28
-
29
-
30
-
31
-
32
-
33
-
34
-
35
-
36
-
37
-
38
-
39
-
40
-
41
-
42
-
43
-
44
-
45
-
46
-
47
-
48
-
49
-
50
-
51
-
52
-
53
-
54
-
55
-
56
-
57
-
58
-
59
-
60
-
61
-
62
-
63
-
64
-
65
-
66
-
67
-
68
-
69
-
70
-
71
-
72
-
73
-
74
-
75
-
76
-
77
-
78
-
79
-
80
-
81
-
82
-
83
-
 84
84 -
 85
85 -
 86
86 -
 87
87 -
 88
88 -
 89
89 -
 90
90 -
 91
91 -
 92
92 -
 93
93 -
 94
94 -
95
-
96
-
97
-
98
-
99
-
100
-
101
-
102
-
103
-
104
-
105
-
106
-
107
-
108
 |
 |