Belkin F5D7632-4_V3000 User Manual - Page 46
Setting up a Bridge Between your Router, and a Secondary Access Point
 |
View all Belkin F5D7632-4_V3000 manuals
Add to My Manuals
Save this manual to your list of manuals |
Page 46 highlights
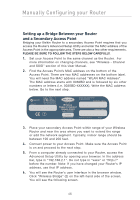
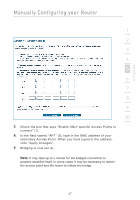
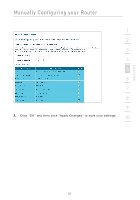
Manually Configuring your Router Setting up a Bridge Between your Router and a Secondary Access Point Bridging your Belkin Router to a secondary Access Point requires that you access the Router's Advanced Setup Utility and enter the MAC address of the Access Point in the appropriate area. There are also a few other requirements. PLEASE BE SURE TO FOLLOW THE STEPS BELOW CAREFULLY. 1. Set your Access Point to the same channel as the Router. For more information on changing channels, see "Wireless - Channel and SSID" section of this User Manual. 2. Find the Access Point's MAC address on the bottom of the Access Point. There are two MAC addresses on the bottom label. You will need the MAC address named "WLAN MAC Address". The MAC address starts with 0030BD and is followed by six other numbers or letters (i.e. 0030BD-XXXXXX). Write the MAC address below. Go to the next step. Serial # F5D7131 FCC ID: K7SF5D7130A Complies with Canada RSS-210 IC: 3623A-F5D7130A WLAN MAC Address Wireless Range Extender/ Access Point model # F5D7131 LAN MAC Address P81807 3. Place your secondary Access Point within range of your Wireless Router and near the area where you want to extend the range or add the network segment. Typically, indoor range should be between 100 and 200 feet. 4. Connect power to your Access Point. Make sure the Access Point is on and proceed to the next step. 5. From a computer already connected to your Router, access the Advanced Setup Utility by opening your browser. In the address bar, type in "192.168.2.1". Do not type in "www" or "http://" before the number. Note: If you have changed your Router's IP address, use that IP address. 6. You will see the Router's user interface in the browser window. Click "Wireless Bridge" (2) on the left-hand side of the screen. You will see the following screen. 46
-
 1
1 -
2
-
3
-
4
-
5
-
6
-
7
-
8
-
9
-
10
-
11
-
12
-
13
-
14
-
15
-
16
-
17
-
18
-
19
-
20
-
21
-
22
-
23
-
24
-
25
-
26
-
27
-
28
-
29
-
30
-
31
-
32
-
33
-
34
-
35
-
36
-
37
-
38
-
39
-
40
-
 41
41 -
 42
42 -
 43
43 -
 44
44 -
 45
45 -
 46
46 -
 47
47 -
 48
48 -
 49
49 -
 50
50 -
 51
51 -
52
-
53
-
54
-
55
-
56
-
57
-
58
-
59
-
60
-
61
-
62
-
63
-
64
-
65
-
66
-
67
-
68
-
69
-
70
-
71
-
72
-
73
-
74
-
75
-
76
-
77
-
78
-
79
-
80
-
81
-
82
-
83
-
84
-
85
-
86
-
87
-
88
-
89
-
90
-
91
-
92
-
93
-
94
-
95
-
96
-
97
-
98
-
99
-
100
-
101
-
102
-
103
-
104
-
105
-
106
-
107
-
108
 |
 |