Belkin F5D7632-4_V3000 User Manual - Page 66
Enabling/Disabling NAT Network Address Translation, Enabling/Disabling UPnP
 |
View all Belkin F5D7632-4_V3000 manuals
Add to My Manuals
Save this manual to your list of manuals |
Page 66 highlights
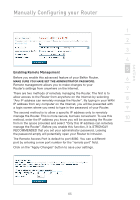
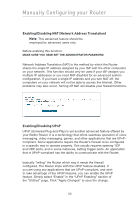
Manually Configuring your Router Enabling/Disabling NAT (Network Address Translation) Note: This advanced feature should be employed by advanced users only. Before enabling this function, MAKE SURE YOU HAVE SET THE ADMINISTRATOR PASSWORD. Network Address Translation (NAT) is the method by which the Router shares the single IP address assigned by your ISP with the other computers on your network. This function should only be used if your ISP assigns you multiple IP addresses or you need NAT disabled for an advanced system configuration. If you have a single IP address and you turn NAT off, the computers on your network will not be able to access the Internet. Other problems may also occur. Turning off NAT will disable your firewall functions. Enabling/Disabling UPnP UPnP (Universal Plug-and-Play) is yet another advanced feature offered by your Belkin Router. It is a technology that offers seamless operation of voice messaging, video messaging, games, and other applications that are UPnPcompliant. Some applications require the Router's firewall to be configured in a specific way to operate properly. This usually requires opening TCP and UDP ports, and in some instances, setting trigger ports. An application that is UPnP-compliant has the ability to communicate with the Router, basically "telling" the Router which way it needs the firewall configured. The Router ships with the UPnP feature disabled. If you are using any applications that are UPnP-compliant, and wish to take advantage of the UPnP features, you can enable the UPnP feature. Simply select "Enable" in the "UPnP Enabling" section of the "Utilities" page. Click "Apply Changes" to save the change. 66
-
 1
1 -
2
-
3
-
4
-
5
-
6
-
7
-
8
-
9
-
10
-
11
-
12
-
13
-
14
-
15
-
16
-
17
-
18
-
19
-
20
-
21
-
22
-
23
-
24
-
25
-
26
-
27
-
28
-
29
-
30
-
31
-
32
-
33
-
34
-
35
-
36
-
37
-
38
-
39
-
40
-
41
-
42
-
43
-
44
-
45
-
46
-
47
-
48
-
49
-
50
-
51
-
52
-
53
-
54
-
55
-
56
-
57
-
58
-
59
-
60
-
 61
61 -
 62
62 -
 63
63 -
 64
64 -
 65
65 -
 66
66 -
 67
67 -
 68
68 -
 69
69 -
 70
70 -
 71
71 -
72
-
73
-
74
-
75
-
76
-
77
-
78
-
79
-
80
-
81
-
82
-
83
-
84
-
85
-
86
-
87
-
88
-
89
-
90
-
91
-
92
-
93
-
94
-
95
-
96
-
97
-
98
-
99
-
100
-
101
-
102
-
103
-
104
-
105
-
106
-
107
-
108
 |
 |
