Brother International MFC-7160C Users Manual - English - Page 201
If You Are Using Windows NT® Workstation Version 4.0, In your Windows
 |
View all Brother International MFC-7160C manuals
Add to My Manuals
Save this manual to your list of manuals |
Page 201 highlights
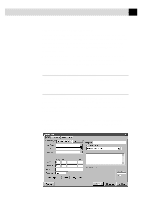
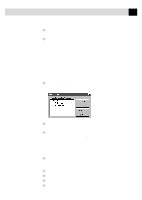
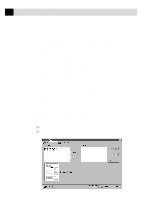
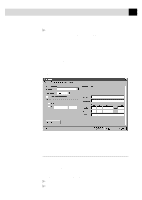
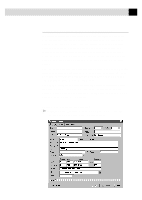
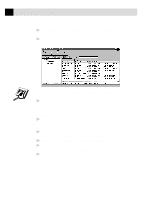
186 C H A P T E R N I N T E E N 3 Select NetCentric™ FaxStorm from the list of printers. 4 Click Properties (or click the button that displays the properties of the printer in the application you are using). 5 Select Print to Fax and click OK to close the Properties dialog box. The Print Driver saves these properties until you change them again. If you are printing to a file rather than faxing, open the Properties dialog box to select Print2File. 6 Click OK to print the document. The Send Fax dialog box appears. 7 Enter the recipient's fax number, select a cover page and any options, if desired. If You Are Using Windows NT® Workstation Version 4.0 1 In your Windows® application, open the document you wish to convert. 2 Select Print from the File menu. 3 In the Print dialog window, select NetCentric™ FaxStorm from your list of printers. 4 Click Properties (or click the button that displays the properties of the printer in the application you are using). 5 Select the Document tab and click the Print2File radio button. 6 Select the File Options tab and click the Manual, prompt each time for file name radio button. 7 Click the Programs tab and click the Run program after creating image file radio button. The Program Exec text box should contain the path to the quickfax executable. If the text box is empty, enter the path to the quickfax executable. It is located in the bin directory beneath the directory in which you installed the application. 8 Click OK to close the Properties dialog box. 9 Click OK on the Print dialog box. The file is now converted to a FAX file and the Send Fax application is launched, allowing you to fax the document you have converted.
-
 1
1 -
2
-
3
-
4
-
5
-
6
-
7
-
8
-
9
-
10
-
11
-
12
-
13
-
14
-
15
-
16
-
17
-
18
-
19
-
20
-
21
-
22
-
23
-
24
-
25
-
26
-
27
-
28
-
29
-
30
-
31
-
32
-
33
-
34
-
35
-
36
-
37
-
38
-
39
-
40
-
41
-
42
-
43
-
44
-
45
-
46
-
47
-
48
-
49
-
50
-
51
-
52
-
53
-
54
-
55
-
56
-
57
-
58
-
59
-
60
-
61
-
62
-
63
-
64
-
65
-
66
-
67
-
68
-
69
-
70
-
71
-
72
-
73
-
74
-
75
-
76
-
77
-
78
-
79
-
80
-
81
-
82
-
83
-
84
-
85
-
86
-
87
-
88
-
89
-
90
-
91
-
92
-
93
-
94
-
95
-
96
-
97
-
98
-
99
-
100
-
101
-
102
-
103
-
104
-
105
-
106
-
107
-
108
-
109
-
110
-
111
-
112
-
113
-
114
-
115
-
116
-
117
-
118
-
119
-
120
-
121
-
122
-
123
-
124
-
125
-
126
-
127
-
128
-
129
-
130
-
131
-
132
-
133
-
134
-
135
-
136
-
137
-
138
-
139
-
140
-
141
-
142
-
143
-
144
-
145
-
146
-
147
-
148
-
149
-
150
-
151
-
152
-
153
-
154
-
155
-
156
-
157
-
158
-
159
-
160
-
161
-
162
-
163
-
164
-
165
-
166
-
167
-
168
-
169
-
170
-
171
-
172
-
173
-
174
-
175
-
176
-
177
-
178
-
179
-
180
-
181
-
182
-
183
-
184
-
185
-
186
-
187
-
188
-
189
-
190
-
191
-
192
-
193
-
194
-
195
-
 196
196 -
 197
197 -
 198
198 -
 199
199 -
 200
200 -
 201
201 -
 202
202 -
 203
203 -
 204
204 -
 205
205 -
 206
206 -
207
-
208
-
209
-
210
-
211
-
212
-
213
-
214
-
215
-
216
-
217
-
218
-
219
-
220
-
221
-
222
-
223
-
224
-
225
-
226
-
227
-
228
-
229
-
230
-
231
-
232
-
233
-
234
-
235
-
236
-
237
-
238
-
239
-
240
-
241
-
242
-
243
-
244
-
245
-
246
-
247
-
248
-
249
-
250
-
251
-
252
-
253
-
254
-
255
-
256
-
257
-
258
-
259
-
260
-
261
-
262
-
263
-
264
-
265
-
266
-
267
-
268
-
269
-
270
-
271
-
272
-
273
-
274
-
275
 |
 |