Brother International MFC-7160C Users Manual - English - Page 217
Installing 3D FaxSpeed
 |
View all Brother International MFC-7160C manuals
Add to My Manuals
Save this manual to your list of manuals |
Page 217 highlights
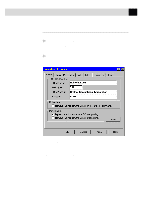
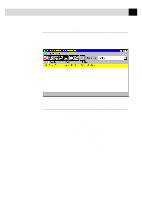
202 C H A P T E R T W E N T Y - O N E This chapter is only an Introduction to 3D FaxSpeed. After you install 3D FaxSpeed on your computer, check the README.WRI file in the root directory of CD-ROM 1 for last-minute important information and troubleshooting tips that were not included in the On-Line Documentation. Use the Help pull down menu in 3D FaxSpeed to access HELP, as needed, to learn the many features and functions available in 3D FaxSpeed. Installing 3D FaxSpeed In the CD-ROM window, click the Install 3D FaxSpeed button and follow the prompts on each screen. If your Windows® Display System Settings (Windows® Setup) is set to a Large Font display, then there may be irregularities in the appearance of 3D FaxSpeed screens. 3D FaxSpeed cannot be used at all with Large Fonts and 640x480 display resolution. 1 Run Windows®, then insert the Brother CD-ROM #1 into your CD- ROM drive. 2 When you insert the CD-ROM into the PC with Windows® 95 or 98, the screen appears automatically. (You can also run: x:SETUP.EXE from Explorer.) With Windows® 3.1 or 3.11, from the File menu run x:SETUP.EXE. 3 Click on the 3D FaxSpeed button to start the install program. 4 Type in your name or the name of your company. This name will be appended to each InfoImage to identify you as the sender. 5 Click the Continue button. The second installation window appears with the path displayed as c:\FaxSpeed.
-
 1
1 -
2
-
3
-
4
-
5
-
6
-
7
-
8
-
9
-
10
-
11
-
12
-
13
-
14
-
15
-
16
-
17
-
18
-
19
-
20
-
21
-
22
-
23
-
24
-
25
-
26
-
27
-
28
-
29
-
30
-
31
-
32
-
33
-
34
-
35
-
36
-
37
-
38
-
39
-
40
-
41
-
42
-
43
-
44
-
45
-
46
-
47
-
48
-
49
-
50
-
51
-
52
-
53
-
54
-
55
-
56
-
57
-
58
-
59
-
60
-
61
-
62
-
63
-
64
-
65
-
66
-
67
-
68
-
69
-
70
-
71
-
72
-
73
-
74
-
75
-
76
-
77
-
78
-
79
-
80
-
81
-
82
-
83
-
84
-
85
-
86
-
87
-
88
-
89
-
90
-
91
-
92
-
93
-
94
-
95
-
96
-
97
-
98
-
99
-
100
-
101
-
102
-
103
-
104
-
105
-
106
-
107
-
108
-
109
-
110
-
111
-
112
-
113
-
114
-
115
-
116
-
117
-
118
-
119
-
120
-
121
-
122
-
123
-
124
-
125
-
126
-
127
-
128
-
129
-
130
-
131
-
132
-
133
-
134
-
135
-
136
-
137
-
138
-
139
-
140
-
141
-
142
-
143
-
144
-
145
-
146
-
147
-
148
-
149
-
150
-
151
-
152
-
153
-
154
-
155
-
156
-
157
-
158
-
159
-
160
-
161
-
162
-
163
-
164
-
165
-
166
-
167
-
168
-
169
-
170
-
171
-
172
-
173
-
174
-
175
-
176
-
177
-
178
-
179
-
180
-
181
-
182
-
183
-
184
-
185
-
186
-
187
-
188
-
189
-
190
-
191
-
192
-
193
-
194
-
195
-
196
-
197
-
198
-
199
-
200
-
201
-
202
-
203
-
204
-
205
-
206
-
207
-
208
-
209
-
210
-
211
-
 212
212 -
 213
213 -
 214
214 -
 215
215 -
 216
216 -
 217
217 -
 218
218 -
 219
219 -
 220
220 -
 221
221 -
 222
222 -
223
-
224
-
225
-
226
-
227
-
228
-
229
-
230
-
231
-
232
-
233
-
234
-
235
-
236
-
237
-
238
-
239
-
240
-
241
-
242
-
243
-
244
-
245
-
246
-
247
-
248
-
249
-
250
-
251
-
252
-
253
-
254
-
255
-
256
-
257
-
258
-
259
-
260
-
261
-
262
-
263
-
264
-
265
-
266
-
267
-
268
-
269
-
270
-
271
-
272
-
273
-
274
-
275
 |
 |
