Brother International MFC-7160C Users Manual - English - Page 204
Setting Up Multiple Addresses, Edit/View, Contact Detail, General, Notes, User Fields
 |
View all Brother International MFC-7160C manuals
Add to My Manuals
Save this manual to your list of manuals |
Page 204 highlights
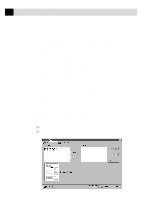
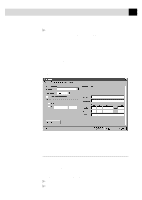
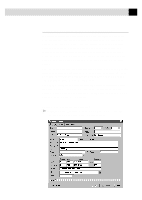
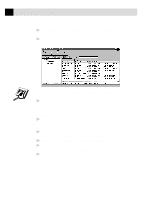
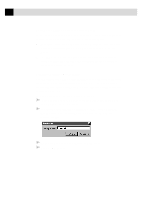
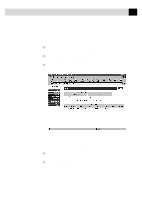
189 U S I N G I N T E R N E T F A X I N G W I T H N E T C E N T R I C ™ F A X S T O R M To edit the information of an existing contact, open the Contact Detail window for that contact: 1 In the Contact Manager window, double-click on the contact -OR- Select the contact in the Contact Manager window and select Edit/View from the Contact menu, or click the Edit/View button. 2 When the Contact Detail window appears, enter the additional information and changes, as needed. If you are ready to accept your changes, skip to Step 5. 3 To add another location for this contact, select the Add... button. The Add Location window will appear: 4 Enter the name of the new location and click the OK button. The Contact Detail window reappears and you will be prompted to enter the new location information. 5 When you are ready to accept the information in the Contact Detail window, click the OK button to save your changes. 6 When the Contact Manager window re-appears, close it. Setting Up Multiple Addresses The Contact Detail window has three tabs: General, Notes and User Fields. The General tab of the Contact Detail window has a separate sub-tab for each address or location. On the General tab you can modify the contact information, add and delete addresses, launch a web browser to view that contact's URL, specify the contact's default medium for file delivery (either fax or e-mail) and go to the Country Lookup utility to look up country codes. See the online Help for more information. On the Notes tab, you can enter personal notes to the contact's record. On the User Fields tab, you can define user fields for adding additional information about the contact.
-
 1
1 -
2
-
3
-
4
-
5
-
6
-
7
-
8
-
9
-
10
-
11
-
12
-
13
-
14
-
15
-
16
-
17
-
18
-
19
-
20
-
21
-
22
-
23
-
24
-
25
-
26
-
27
-
28
-
29
-
30
-
31
-
32
-
33
-
34
-
35
-
36
-
37
-
38
-
39
-
40
-
41
-
42
-
43
-
44
-
45
-
46
-
47
-
48
-
49
-
50
-
51
-
52
-
53
-
54
-
55
-
56
-
57
-
58
-
59
-
60
-
61
-
62
-
63
-
64
-
65
-
66
-
67
-
68
-
69
-
70
-
71
-
72
-
73
-
74
-
75
-
76
-
77
-
78
-
79
-
80
-
81
-
82
-
83
-
84
-
85
-
86
-
87
-
88
-
89
-
90
-
91
-
92
-
93
-
94
-
95
-
96
-
97
-
98
-
99
-
100
-
101
-
102
-
103
-
104
-
105
-
106
-
107
-
108
-
109
-
110
-
111
-
112
-
113
-
114
-
115
-
116
-
117
-
118
-
119
-
120
-
121
-
122
-
123
-
124
-
125
-
126
-
127
-
128
-
129
-
130
-
131
-
132
-
133
-
134
-
135
-
136
-
137
-
138
-
139
-
140
-
141
-
142
-
143
-
144
-
145
-
146
-
147
-
148
-
149
-
150
-
151
-
152
-
153
-
154
-
155
-
156
-
157
-
158
-
159
-
160
-
161
-
162
-
163
-
164
-
165
-
166
-
167
-
168
-
169
-
170
-
171
-
172
-
173
-
174
-
175
-
176
-
177
-
178
-
179
-
180
-
181
-
182
-
183
-
184
-
185
-
186
-
187
-
188
-
189
-
190
-
191
-
192
-
193
-
194
-
195
-
196
-
197
-
198
-
 199
199 -
 200
200 -
 201
201 -
 202
202 -
 203
203 -
 204
204 -
 205
205 -
 206
206 -
 207
207 -
 208
208 -
 209
209 -
210
-
211
-
212
-
213
-
214
-
215
-
216
-
217
-
218
-
219
-
220
-
221
-
222
-
223
-
224
-
225
-
226
-
227
-
228
-
229
-
230
-
231
-
232
-
233
-
234
-
235
-
236
-
237
-
238
-
239
-
240
-
241
-
242
-
243
-
244
-
245
-
246
-
247
-
248
-
249
-
250
-
251
-
252
-
253
-
254
-
255
-
256
-
257
-
258
-
259
-
260
-
261
-
262
-
263
-
264
-
265
-
266
-
267
-
268
-
269
-
270
-
271
-
272
-
273
-
274
-
275
 |
 |
