Compaq nc6120 Hardware and Software Guide - Page 108
Setting Tiling Preferences, Switching to an External Display
 |
View all Compaq nc6120 manuals
Add to My Manuals
Save this manual to your list of manuals |
Page 108 highlights
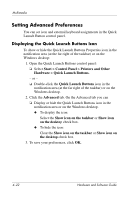
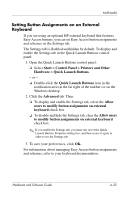
Multimedia Switching to an External Display By default, the Automatically switch to external display setting in the Presentation tab is not selected. When you press the Presentation mode button, the application, folder, file, or Web site you selected in the Program to Start setting opens. To view the selected application, folder, file, or Web site on an additional, external display: 1. Connect an external display to your notebook. 2. Click Automatically switch to external display. 3. Press the Presentation mode button. The power scheme changes to Presentation. ✎ You can alternate between displays by pressing the Presentation mode button. If you do this, the power scheme reverts to the original settings. Setting Tiling Preferences To set tiling preferences on the Windows desktop: 1. Open the Quick Launch Buttons control panel: ❏ Select Start > Control Panel > Printers and Other Hardware > Quick Launch Buttons. - or - ❏ Double-click the Quick Launch Buttons icon in the notification area (at the far right of the taskbar) or on the Windows desktop. 2. Click the Quick Tile tab. 3. Click Vertical Tile or Horizontal Tile, and then click the applications to tile in the Applications currently running box. 4. To save your preferences, click OK. Hardware and Software Guide 4-21
-
 1
1 -
2
-
3
-
4
-
5
-
6
-
7
-
8
-
9
-
10
-
11
-
12
-
13
-
14
-
15
-
16
-
17
-
18
-
19
-
20
-
21
-
22
-
23
-
24
-
25
-
26
-
27
-
28
-
29
-
30
-
31
-
32
-
33
-
34
-
35
-
36
-
37
-
38
-
39
-
40
-
41
-
42
-
43
-
44
-
45
-
46
-
47
-
48
-
49
-
50
-
51
-
52
-
53
-
54
-
55
-
56
-
57
-
58
-
59
-
60
-
61
-
62
-
63
-
64
-
65
-
66
-
67
-
68
-
69
-
70
-
71
-
72
-
73
-
74
-
75
-
76
-
77
-
78
-
79
-
80
-
81
-
82
-
83
-
84
-
85
-
86
-
87
-
88
-
89
-
90
-
91
-
92
-
93
-
94
-
95
-
96
-
97
-
98
-
99
-
100
-
101
-
102
-
 103
103 -
 104
104 -
 105
105 -
 106
106 -
 107
107 -
 108
108 -
 109
109 -
 110
110 -
 111
111 -
 112
112 -
 113
113 -
114
-
115
-
116
-
117
-
118
-
119
-
120
-
121
-
122
-
123
-
124
-
125
-
126
-
127
-
128
-
129
-
130
-
131
-
132
-
133
-
134
-
135
-
136
-
137
-
138
-
139
-
140
-
141
-
142
-
143
-
144
-
145
-
146
-
147
-
148
-
149
-
150
-
151
-
152
-
153
-
154
-
155
-
156
-
157
-
158
-
159
-
160
-
161
-
162
-
163
-
164
-
165
-
166
-
167
-
168
-
169
-
170
-
171
-
172
-
173
-
174
-
175
-
176
-
177
-
178
-
179
-
180
-
181
-
182
-
183
-
184
-
185
-
186
-
187
-
188
-
189
-
190
-
191
-
192
-
193
-
194
-
195
-
196
-
197
-
198
-
199
-
200
-
201
-
202
-
203
-
204
-
205
-
206
-
207
-
208
-
209
-
210
-
211
-
212
-
213
-
214
-
215
-
216
-
217
-
218
-
219
-
220
-
221
-
222
-
223
-
224
-
225
-
226
-
227
-
228
-
229
-
230
-
231
-
232
-
233
-
234
-
235
-
236
-
237
-
238
-
239
-
240
-
241
-
242
-
243
-
244
-
245
-
246
 |
 |