Dell Inspiron 2000 Reference and Troubleshooting Guide - Page 36
IDE Devices
 |
View all Dell Inspiron 2000 manuals
Add to My Manuals
Save this manual to your list of manuals |
Page 36 highlights
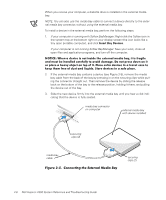
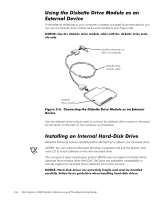
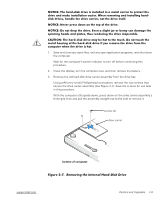
4. Remove the new hard-disk drive from its packaging. Save the original packaging to use when storing or shipping the hard-disk drive. 5. Install the new hard-disk drive into the computer (the drive comes in a drive carrier). Insert the hard-disk drive carrier assembly into the drive bay, connector first and label facing down (toward the top of the computer). Push the assembly straight in until it snaps into place, with the assembly flush with the computer case. 6. Replace the screws you removed in step 3. 7. Turn on the computer. 8. Partition and format the drive as described in "Partitioning and Formatting the Hard-Disk Drive" in Chapter 4. 9. Install the operating system on the drive. For instructions, see Chapter 4, "System Software Solutions." 10. Test the drive by running the IDE Devices device group tests in the Dell Diagnostics. For instructions, see "Running the Dell Diagnostics" in Chapter 3. 2-10 Dell Inspiron 2000 System Reference and Troubleshooting Guide
-
 1
1 -
2
-
3
-
4
-
5
-
6
-
7
-
8
-
9
-
10
-
11
-
12
-
13
-
14
-
15
-
16
-
17
-
18
-
19
-
20
-
21
-
22
-
23
-
24
-
25
-
26
-
27
-
28
-
29
-
30
-
 31
31 -
 32
32 -
 33
33 -
 34
34 -
 35
35 -
 36
36 -
 37
37 -
 38
38 -
 39
39 -
 40
40 -
 41
41 -
42
-
43
-
44
-
45
-
46
-
47
-
48
-
49
-
50
-
51
-
52
-
53
-
54
-
55
-
56
-
57
-
58
-
59
-
60
-
61
-
62
-
63
-
64
-
65
-
66
-
67
-
68
-
69
-
70
-
71
-
72
-
73
-
74
-
75
-
76
-
77
-
78
-
79
-
80
-
81
-
82
-
83
-
84
-
85
-
86
-
87
-
88
-
89
-
90
-
91
-
92
-
93
-
94
-
95
-
96
-
97
-
98
-
99
-
100
-
101
-
102
-
103
-
104
-
105
-
106
-
107
-
108
-
109
-
110
-
111
-
112
-
113
-
114
-
115
-
116
-
117
-
118
-
119
-
120
-
121
-
122
-
123
-
124
-
125
-
126
-
127
-
128
-
129
-
130
-
131
-
132
 |
 |