Dell Inspiron 2000 Reference and Troubleshooting Guide - Page 43
IDE Devices, ScanDisk, Start, Programs, > Accessories, > System, Tools, Check, Error-checking
 |
View all Dell Inspiron 2000 manuals
Add to My Manuals
Save this manual to your list of manuals |
Page 43 highlights
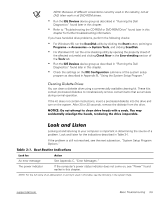
NOTE: Because of different conventions currently used in the industry, not all DVD titles work in all DVD-ROM drives. Run the IDE Devices device group as described in "Running the Dell Diagnostics" found later in this chapter. Refer to "Troubleshooting the CD-ROM or DVD-ROM Drive" found later in this chapter for further troubleshooting information. If you have hard-disk drive problems, perform the following checks: For Windows 98, run the ScanDisk utility by clicking the Start button, pointing to Programs-> Accessories-> System Tools, and clicking ScanDisk. For Windows NT, run the error-checking utility by opening the property sheet of the affected volume(s) and clicking Check Now in the Error-checking section of the Tools tab. Run the IDE Devices device group as described in "Running the Dell Diagnostics" found later in this chapter. Check the settings on the IDE Configuration submenu of the system setup program as described in Appendix B, "Using the System Setup Program." You can clean a diskette drive using a commercially available cleaning kit. These kits contain pretreated diskettes to nonabrasively remove contaminants that accumulate during normal operation. If the kit does not contain instructions, insert a pretreated diskette into the drive and turn on the system. After 20 or 30 seconds, remove the diskette from the drive. Looking at and listening to your computer is important in determining the source of a problem. Look and listen for the indications described in Table 3-1. If the problem is still not resolved, see the next subsection, "System Setup Program Options." An error message See Appendix C, "Error Messages." The power indicator If the computer's power status indicator does not come on, see "Power" found earlier in this chapter. NOTE: For the full name of an abbreviation or acronym used in this table, see the Glossary in the system Help. support.dell.com Basic Troubleshooting 3-5
-
 1
1 -
2
-
3
-
4
-
5
-
6
-
7
-
8
-
9
-
10
-
11
-
12
-
13
-
14
-
15
-
16
-
17
-
18
-
19
-
20
-
21
-
22
-
23
-
24
-
25
-
26
-
27
-
28
-
29
-
30
-
31
-
32
-
33
-
34
-
35
-
36
-
37
-
 38
38 -
 39
39 -
 40
40 -
 41
41 -
 42
42 -
 43
43 -
 44
44 -
 45
45 -
 46
46 -
 47
47 -
 48
48 -
49
-
50
-
51
-
52
-
53
-
54
-
55
-
56
-
57
-
58
-
59
-
60
-
61
-
62
-
63
-
64
-
65
-
66
-
67
-
68
-
69
-
70
-
71
-
72
-
73
-
74
-
75
-
76
-
77
-
78
-
79
-
80
-
81
-
82
-
83
-
84
-
85
-
86
-
87
-
88
-
89
-
90
-
91
-
92
-
93
-
94
-
95
-
96
-
97
-
98
-
99
-
100
-
101
-
102
-
103
-
104
-
105
-
106
-
107
-
108
-
109
-
110
-
111
-
112
-
113
-
114
-
115
-
116
-
117
-
118
-
119
-
120
-
121
-
122
-
123
-
124
-
125
-
126
-
127
-
128
-
129
-
130
-
131
-
132
 |
 |
