Dell Inspiron 2000 Reference and Troubleshooting Guide - Page 60
Start, Welcome, Information, Setup Type, Core Drivers, All Drivers and Applications, Custom,
 |
View all Dell Inspiron 2000 manuals
Add to My Manuals
Save this manual to your list of manuals |
Page 60 highlights
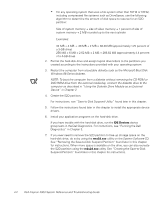
NOTE: If a Version Conflict dialog box appears at any time during this procedure, click OK and continue with the procedure. 1. Insert your System Software CD into the CD-ROM or DVD-ROM drive. 2. Click Start, click Run, and type (where d is your CD-ROM or DVD-ROM drive letter) in the Run dialog box. 3. Click Next at the Welcome screen. 4. Read the Information screen and click Next. The system setup program checks to see if you need an operating system update before installing the drivers. 5. If the system setup program launches the Operating System Update program, click OK and then follow the screen prompts to complete the update. You may need to click OK to reboot the system several times during this process. When the system stops prompting you to reboot, repeat steps 2, 3, and 4. 6. At the Setup Type dialog box, highlight the level of installation you desire: Core Drivers - includes the audio, video, touch pad, modem, local area network (LAN), and MS-DOS CD-ROM drivers. All Drivers and Applications - includes the core drivers plus other application programs such as the Yamaha Software Wavetable, Softex BayManager, your computer's system Help, and various system utilities. Custom - lists all available drivers, applications, and utilities. To perform a custom installation, click Custom and then click the radio button for each item you want to install. 7. Click Next to view a list of the files that will be installed; then click Next again. The selected files are copied to your hard-disk drive in preparation for installation. 8. Read the Information dialog box and click OK. The Windows driver QuickInstall screen appears and driver installation begins. 9. At the Restarting Windows dialog box, click the Yes radio button and then click OK to restart the computer. 10. If an Add New Hardware Wizard dialog box appears, click Next and follow the screen prompts, accepting all defaults. 11. If you are prompted to insert your Windows operating system CD, remove the System Software CD, insert the Windows CD, and click OK. If after doing this you are prompted again to insert the CD, click OK to continue the installation. 4-4 Dell Inspiron 2000 System Reference and Troubleshooting Guide
-
 1
1 -
2
-
3
-
4
-
5
-
6
-
7
-
8
-
9
-
10
-
11
-
12
-
13
-
14
-
15
-
16
-
17
-
18
-
19
-
20
-
21
-
22
-
23
-
24
-
25
-
26
-
27
-
28
-
29
-
30
-
31
-
32
-
33
-
34
-
35
-
36
-
37
-
38
-
39
-
40
-
41
-
42
-
43
-
44
-
45
-
46
-
47
-
48
-
49
-
50
-
51
-
52
-
53
-
54
-
 55
55 -
 56
56 -
 57
57 -
 58
58 -
 59
59 -
 60
60 -
 61
61 -
 62
62 -
 63
63 -
 64
64 -
 65
65 -
66
-
67
-
68
-
69
-
70
-
71
-
72
-
73
-
74
-
75
-
76
-
77
-
78
-
79
-
80
-
81
-
82
-
83
-
84
-
85
-
86
-
87
-
88
-
89
-
90
-
91
-
92
-
93
-
94
-
95
-
96
-
97
-
98
-
99
-
100
-
101
-
102
-
103
-
104
-
105
-
106
-
107
-
108
-
109
-
110
-
111
-
112
-
113
-
114
-
115
-
116
-
117
-
118
-
119
-
120
-
121
-
122
-
123
-
124
-
125
-
126
-
127
-
128
-
129
-
130
-
131
-
132
 |
 |