Dell OptiPlex GX300 User Guide - Page 15
Advanced Testing
 |
View all Dell OptiPlex GX300 manuals
Add to My Manuals
Save this manual to your list of manuals |
Page 15 highlights
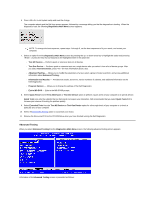
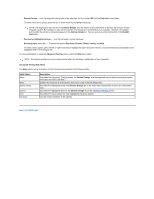
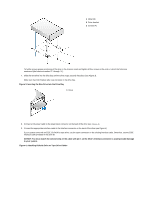
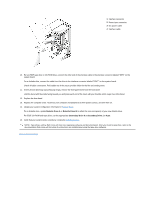
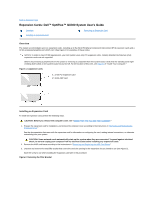
6. Press to exit system setup and save the change. The computer reboots and the Dell logo screen appears, followed by a message telling you that the diagnostics is loading. When the diagnostics load, the following Diagnostics Main Menu screen appears: NOTE: To change the boot sequence, repeat steps 1 through 6, set the boot sequence to fit your needs, and restart your computer. 7. Select an option from the Diagnostics Main Menu screen by pressing the up- or down-arrow key to highlight the option and pressing , or press the key that corresponds to the highlighted letter in the option title. l Test All Devices - Performs quick or extensive tests on all devices. l Test One Device - Performs quick or extensive tests on a single device after you select it from a list of device groups. After you select Test One Device, press for more information about a test. l Advanced Testing - Allows you to modify the parameters of a test, select a group of tests to perform, and access additional information about Advanced Testing. l Information and Results - Provides test results, test errors, version numbers of subtests, and additional information on the Dell Diagnostics. l Program Options - Allows you to change the settings of the Dell Diagnostics. l Exit to MS-DOS - Exits to the MS-DOS® prompt. 8. Select Quick Tests from the Test All Devices or Test One Device option to perform a quick check of your computer or a specific device. Quick Tests runs only the subtests that run fast and do not require user interaction. Dell recommends that you select Quick Tests first to increase your chance of locating the problem quickly. 9. Select Extended Tests from the Test All Devices or Test One Device option for a thorough check of your computer or to check a particular area of your computer. 10. Select the Advanced Testing option to customize your test(s). 11. Remove the ResourceCD from the CD-ROM drive when you have finished running the Dell Diagnostics. Advanced Testing When you select Advanced Testing from the Diagnostics Main Menu screen, the following advanced testing screen appears. Information in the Advanced Testing screen is presented as follows:
-
 1
1 -
2
-
3
-
4
-
5
-
6
-
7
-
8
-
9
-
 10
10 -
 11
11 -
 12
12 -
 13
13 -
 14
14 -
 15
15 -
 16
16 -
 17
17 -
 18
18 -
 19
19 -
 20
20 -
21
-
22
-
23
-
24
-
25
-
26
-
27
-
28
-
29
-
30
-
31
-
32
-
33
-
34
-
35
-
36
-
37
-
38
-
39
-
40
-
41
-
42
-
43
-
44
-
45
-
46
-
47
-
48
-
49
-
50
-
51
-
52
-
53
-
54
-
55
-
56
-
57
-
58
-
59
-
60
-
61
-
62
-
63
-
64
-
65
-
66
-
67
-
68
-
69
-
70
-
71
-
72
-
73
-
74
-
75
-
76
-
77
-
78
-
79
-
80
-
81
-
82
-
83
-
84
-
85
-
86
-
87
-
88
-
89
-
90
-
91
 |
 |
