Dell OptiPlex GX300 User Guide - Page 68
Chassis Intrusion, Security Cable Slot and Padlock Ring
 |
View all Dell OptiPlex GX300 manuals
Add to My Manuals
Save this manual to your list of manuals |
Page 68 highlights
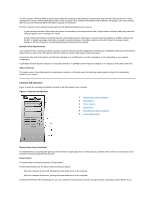
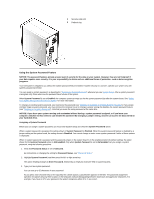
configure the power button, it functions as follows: l When the computer is turned off, pushing the power button turns on the computer. l When the computer is turned on, pushing the power button and holding it for more than 6 seconds turns off the computer. l When the computer is turned on, pushing the power button and releasing it places the computer in a suspended state that you determine through the BIOS configuration. l When the computer is in the suspended state, pushing the power button and releasing it brings the computer out of the suspended state. If the system does not turn off when you press the power button, the system may be hung. Press and hold the power button until the system turns off completely (this process may take several seconds). Alternatively, press the reset button to reset the system and reboot. If the system is hung and both buttons fail to function properly, unplug the AC power cable from the computer, wait for it to completely stop running, plug in the AC power cable, and if it the system does not restart, press the power button to restart the system. Power Indicator The power indicator on the front of the computer has a light-emitting diode (LED) that illuminates in two different colors and blinks or remains solid to indicate several different states. See "Diagnostic LEDs" for a description of each of these states. Reset Button The reset button allows you to reboot (restart) your system without having to turn the power off and then on again. Rebooting the system in this manner reduces stress on system components. However, be sure that you have saved and closed all open files and application programs (if possible) to avoid losing any data. Then perform an orderly shutdown of the operating system (see your operating system documentation for instructions). Hard-Disk Drive Access Indicator The hard-disk drive access indicator lights up when a hard-disk drive or CD-ROM drive is reading data from or writing data to the drive. Cover Release Button On the back of the chassis, slide the upper half of the padlock ring to the left. Then press the cover release button to remove the computer cover. Chassis Intrusion An integrated chassis intrusion alarm displays the status of the system chassis intrusion monitor. If the chassis has been opened, the setting changes to Detected and the following message appears during the boot sequence at system start-up: Alert! Cover was previously removed. Use System Setup to reset the alarm so that future intrusions are detected. Security Cable Slot and Padlock Ring On the back of the computer are a security cable slot and padlock ring (see Figure 3) for attaching commercially available antitheft devices. Security cables for personal computers usually include a segment of galvanized cable with an attached locking device and key. To prevent unauthorized removal of your computer, loop the cable around an immovable object, insert the locking device into the security cable slot on the back of your computer, and lock the device with the key provided. Complete instructions for installing this kind of antitheft device are usually included with the device. NOTE: Antitheft devices are of differing designs. Before purchasing such a device, make sure it works with the cable slot on your computer. Figure 3. Security Cable Slot and Padlock Ring
-
 1
1 -
2
-
3
-
4
-
5
-
6
-
7
-
8
-
9
-
10
-
11
-
12
-
13
-
14
-
15
-
16
-
17
-
18
-
19
-
20
-
21
-
22
-
23
-
24
-
25
-
26
-
27
-
28
-
29
-
30
-
31
-
32
-
33
-
34
-
35
-
36
-
37
-
38
-
39
-
40
-
41
-
42
-
43
-
44
-
45
-
46
-
47
-
48
-
49
-
50
-
51
-
52
-
53
-
54
-
55
-
56
-
57
-
58
-
59
-
60
-
61
-
62
-
 63
63 -
 64
64 -
 65
65 -
 66
66 -
 67
67 -
 68
68 -
 69
69 -
 70
70 -
 71
71 -
 72
72 -
 73
73 -
74
-
75
-
76
-
77
-
78
-
79
-
80
-
81
-
82
-
83
-
84
-
85
-
86
-
87
-
88
-
89
-
90
-
91
 |
 |
