Dell OptiPlex GX300 User Guide - Page 28
Inserting a 1.6-Inch Hard-Disk Drive in the Bracket, Inserting the Drive Bracket
 |
View all Dell OptiPlex GX300 manuals
Add to My Manuals
Save this manual to your list of manuals |
Page 28 highlights
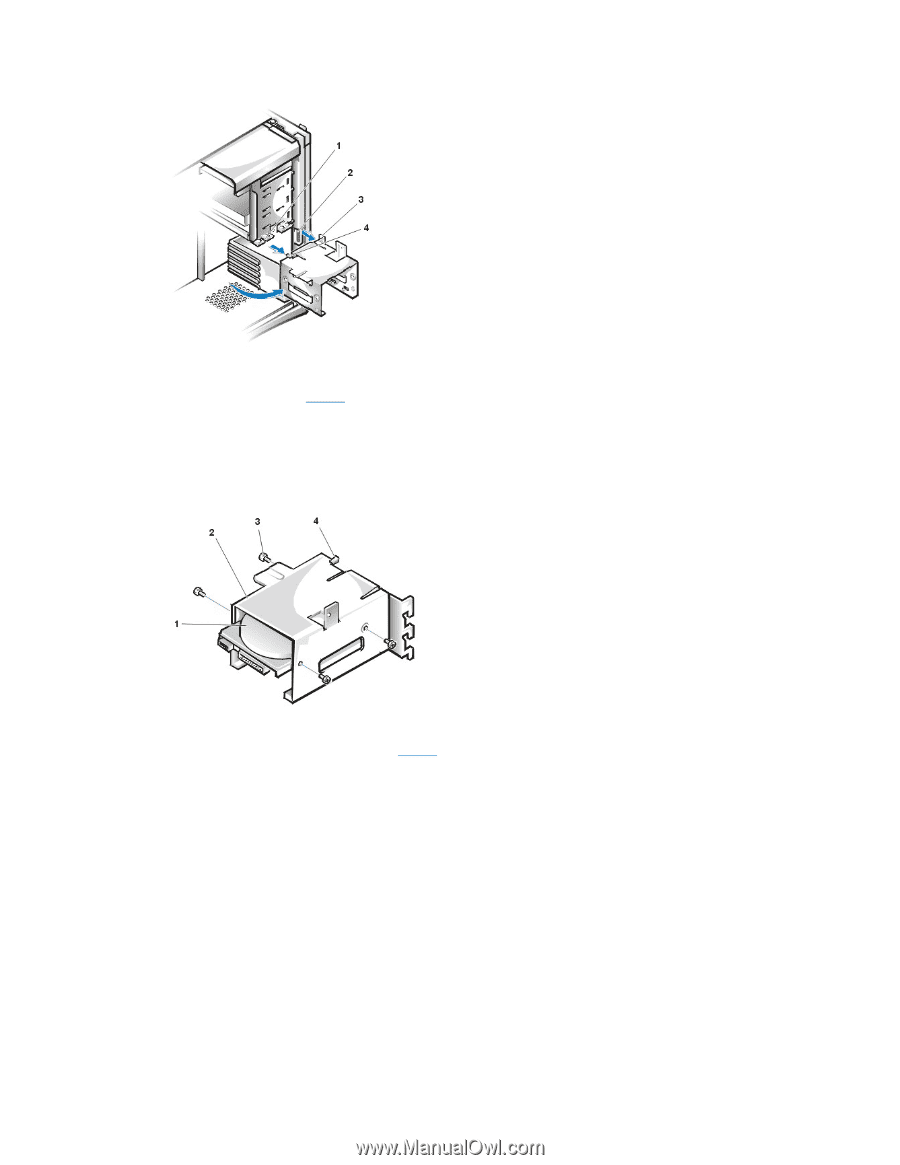
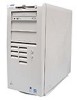
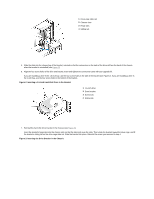
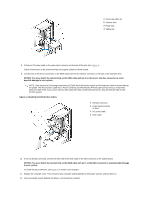
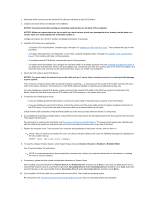
1 Drive-cage slide rail 2 Chassis slots 3 Hinge tabs 4 Sliding tab 5. Slide the drive into the chosen bay of the bracket, oriented so that the connectors on the back of the drive will face the back of the chassis when the bracket is reinstalled (see Figure 2). 6. Align the four screw holes of the drive and bracket. Insert and tighten the screws that came with your upgrade kit. If you are installing a drive in the 1.6-inch bay, use the four screw holes in the side of the bracket (see Figure 2). If you are installing a drive in the 1-inch bay, use the four screw holes in the bottom of the bracket. Figure 2. Inserting a 1.6-Inch Hard-Disk Drive in the Bracket 1 1.6-inch drive 2 Drive bracket 3 Screws (4) 4 Sliding tab 7. Reinstall the hard-disk drive bracket in the chassis (see Figure 3). Insert the bracket's hinge tabs into the chassis slots so that the tabs hook over the slots. Then rotate the bracket toward the drive cage, and fit the bracket's sliding tab on the drive-cage slide rail. Slide the bracket into place. Reinstall the screw you removed in step 4. Figure 3. Inserting the Drive Bracket in the Chassis
-
 1
1 -
2
-
3
-
4
-
5
-
6
-
7
-
8
-
9
-
10
-
11
-
12
-
13
-
14
-
15
-
16
-
17
-
18
-
19
-
20
-
21
-
22
-
 23
23 -
 24
24 -
 25
25 -
 26
26 -
 27
27 -
 28
28 -
 29
29 -
 30
30 -
 31
31 -
 32
32 -
 33
33 -
34
-
35
-
36
-
37
-
38
-
39
-
40
-
41
-
42
-
43
-
44
-
45
-
46
-
47
-
48
-
49
-
50
-
51
-
52
-
53
-
54
-
55
-
56
-
57
-
58
-
59
-
60
-
61
-
62
-
63
-
64
-
65
-
66
-
67
-
68
-
69
-
70
-
71
-
72
-
73
-
74
-
75
-
76
-
77
-
78
-
79
-
80
-
81
-
82
-
83
-
84
-
85
-
86
-
87
-
88
-
89
-
90
-
91
 |
 |