Dell OptiPlex GX300 User Guide - Page 54
System Memory: Dell™ OptiPlex™ GX300 System User's Guide
 |
View all Dell OptiPlex GX300 manuals
Add to My Manuals
Save this manual to your list of manuals |
Page 54 highlights
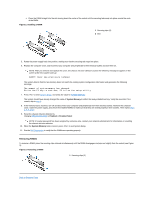
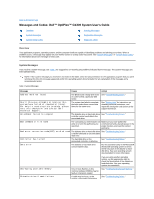
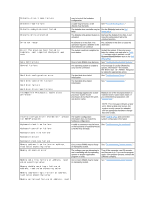
Back to Contents Page System Memory: Dell™ OptiPlex™ GX300 System User's Guide Overview Installing RIMMs Removing RIMMs Overview Before you install new memory modules, download the most recent BIOS for your computer from the Dell Support website at http://support.dell.com. You can increase system memory up to 1 gigabyte (GB) by using Rambus dynamic random-access memory (RDRAM) Rambus in-line memory modules (RIMMs). Figure 3 in "Inside Your Computer" shows the location of the RIMM sockets on the system board. NOTES: To reach the maximum 1-GB memory total, you must install two 512-megabyte (MB) RIMMs (when available) that each have a maximum of 16 memory devices. The system supports no more than a total of 32 memory devices on all installed RIMMs. See Figure 1 for the location of a label on the RIMM that identifies the number of memory devices it contains. You can also determine the number of memory devices installed through the System Memory option in System Setup. The system does not support RIMMs with six memory devices. All RIMM sockets must be occupied either by a RIMM or a continuity card. Figure 1. RIMM Label Showing Number of Memory Devices 1 Number of memory devices in RIMM For optimum operation, Dell recommends that you install a RIMM in socket A first (closest to the processor) before installing a RIMM in socket B. NOTE: Before disconnecting a peripheral from the system or removing a component from the system board, verify that the standby power light-emitting diode (LED) on the system board has turned off. For the location of this LED, see Figure 3 in "Inside Your Computer." Installing RIMMs To upgrade memory, perform the following steps. CAUTION: To avoid the possibility of electric shock, turn off the computer and any peripherals, disconnect them from their electrical outlets, and then wait at least 5 seconds before you remove the computer cover. Also, before you upgrade memory, see the other precautions in "Safety First-For You and Your Computer. " 1. Remove the computer cover according to the instructions in "Removing and Replacing the Computer Cover." 2. Rotate the power supply as described in "Rotating the Power Supply Away From the System Board." 3. If necessary, remove any RIMMs that occupy sockets in which you plan to install the upgrade RIMMs. 4. Install the upgrade RIMMs. a. Locate the plastic securing clips at each end of the socket (see Figure 2). b. Press the clips outward until they snap open.
-
 1
1 -
2
-
3
-
4
-
5
-
6
-
7
-
8
-
9
-
10
-
11
-
12
-
13
-
14
-
15
-
16
-
17
-
18
-
19
-
20
-
21
-
22
-
23
-
24
-
25
-
26
-
27
-
28
-
29
-
30
-
31
-
32
-
33
-
34
-
35
-
36
-
37
-
38
-
39
-
40
-
41
-
42
-
43
-
44
-
45
-
46
-
47
-
48
-
 49
49 -
 50
50 -
 51
51 -
 52
52 -
 53
53 -
 54
54 -
 55
55 -
 56
56 -
 57
57 -
 58
58 -
 59
59 -
60
-
61
-
62
-
63
-
64
-
65
-
66
-
67
-
68
-
69
-
70
-
71
-
72
-
73
-
74
-
75
-
76
-
77
-
78
-
79
-
80
-
81
-
82
-
83
-
84
-
85
-
86
-
87
-
88
-
89
-
90
-
91
 |
 |
