Dell PowerEdge C6220 II Hardware Owners Manual - Page 217
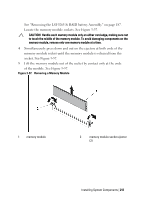
memory module socket until the memory module is released from
 |
View all Dell PowerEdge C6220 II manuals
Add to My Manuals
Save this manual to your list of manuals |
Page 217 highlights
See "Removing the LSI 9265-8i RAID battery Assembly" on page 187. Locate the memory module sockets. See Figure 3-57. CAUTION: Handle each memory module only on either card edge, making sure not to touch the middle of the memory module. To avoid damaging components on the memory module, remove only one memory module at a time. 4 Simultaneously press down and out on the ejectors at both ends of the memory module socket until the memory module is released from the socket. See Figure 3-57. 5 Lift the memory module out of the socket by contact only at the ends of the module. See Figure 3-57. Figure 3-57. Removing a Memory Module 1 memory module 2 memory module socket ejector (2) Installing System Components | 217
-
 1
1 -
2
-
3
-
4
-
5
-
6
-
7
-
8
-
9
-
10
-
11
-
12
-
13
-
14
-
15
-
16
-
17
-
18
-
19
-
20
-
21
-
22
-
23
-
24
-
25
-
26
-
27
-
28
-
29
-
30
-
31
-
32
-
33
-
34
-
35
-
36
-
37
-
38
-
39
-
40
-
41
-
42
-
43
-
44
-
45
-
46
-
47
-
48
-
49
-
50
-
51
-
52
-
53
-
54
-
55
-
56
-
57
-
58
-
59
-
60
-
61
-
62
-
63
-
64
-
65
-
66
-
67
-
68
-
69
-
70
-
71
-
72
-
73
-
74
-
75
-
76
-
77
-
78
-
79
-
80
-
81
-
82
-
83
-
84
-
85
-
86
-
87
-
88
-
89
-
90
-
91
-
92
-
93
-
94
-
95
-
96
-
97
-
98
-
99
-
100
-
101
-
102
-
103
-
104
-
105
-
106
-
107
-
108
-
109
-
110
-
111
-
112
-
113
-
114
-
115
-
116
-
117
-
118
-
119
-
120
-
121
-
122
-
123
-
124
-
125
-
126
-
127
-
128
-
129
-
130
-
131
-
132
-
133
-
134
-
135
-
136
-
137
-
138
-
139
-
140
-
141
-
142
-
143
-
144
-
145
-
146
-
147
-
148
-
149
-
150
-
151
-
152
-
153
-
154
-
155
-
156
-
157
-
158
-
159
-
160
-
161
-
162
-
163
-
164
-
165
-
166
-
167
-
168
-
169
-
170
-
171
-
172
-
173
-
174
-
175
-
176
-
177
-
178
-
179
-
180
-
181
-
182
-
183
-
184
-
185
-
186
-
187
-
188
-
189
-
190
-
191
-
192
-
193
-
194
-
195
-
196
-
197
-
198
-
199
-
200
-
201
-
202
-
203
-
204
-
205
-
206
-
207
-
208
-
209
-
210
-
211
-
 212
212 -
 213
213 -
 214
214 -
 215
215 -
 216
216 -
 217
217 -
 218
218 -
 219
219 -
 220
220 -
 221
221 -
 222
222 -
223
-
224
-
225
-
226
-
227
-
228
-
229
-
230
-
231
-
232
-
233
-
234
-
235
-
236
-
237
-
238
-
239
-
240
-
241
-
242
-
243
-
244
-
245
-
246
-
247
-
248
-
249
-
250
-
251
-
252
-
253
-
254
-
255
-
256
-
257
-
258
-
259
-
260
-
261
-
262
-
263
-
264
-
265
-
266
-
267
-
268
-
269
-
270
-
271
-
272
-
273
-
274
-
275
-
276
-
277
-
278
-
279
-
280
-
281
-
282
-
283
-
284
-
285
-
286
-
287
-
288
-
289
-
290
-
291
-
292
-
293
-
294
-
295
-
296
-
297
-
298
-
299
-
300
-
301
-
302
-
303
-
304
-
305
-
306
-
307
-
308
-
309
-
310
-
311
-
312
-
313
-
314
-
315
-
316
-
317
-
318
-
319
-
320
-
321
-
322
-
323
-
324
-
325
-
326
-
327
-
328
-
329
 |
 |

Installing System Components |
217
See “
Removing the LSI 9265-8i RAID battery Assembly
”
on page 187.
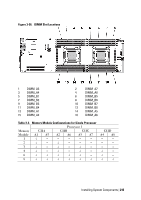
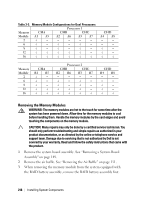
Locate the memory module sockets. See Figure 3-57.
CAUTION: Handle each memory module only on either card edge, making sure not
to touch the middle of the memory module. To avoid damaging components on the
memory module, remove only one memory module at a time.
4
Simultaneously press down and out on the ejectors at both ends of the
memory module socket until the memory module is released from the
socket. See Figure 3-57.
5
Lift the memory module out of the socket by contact only at the ends
of the module. See Figure 3-57.
Figure 3-57.
Removing a Memory Module
1
memory module
2
memory module socket ejector
(2)