Dell PowerEdge T310 Hardware Owner's Manual - Page 103
Power Supplies, Removing a Redundant Power Supply - redundant power &
 |
View all Dell PowerEdge T310 manuals
Add to My Manuals
Save this manual to your list of manuals |
Page 103 highlights
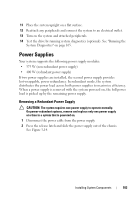
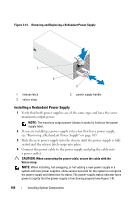
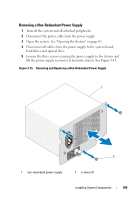
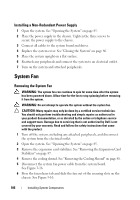
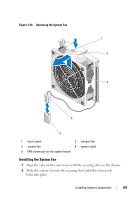
11 Place the system upright on a flat surface. 12 Reattach any peripherals and connect the system to an electrical outlet. 13 Turn on the system and attached peripherals. 14 Test the drive by running system diagnostics (optional). See "Running the System Diagnostics" on page 165. Power Supplies Your system supports the following power supply modules: • 375 W (non-redundant power supply) • 400 W (redundant power supply) If two power supplies are installed, the second power supply provides hot-swappable, power redundancy. In redundant mode, the system distributes the power load across both power supplies to maximize efficiency. When a power supply is removed with the system powered on, the full power load is picked up by the remaining power supply. Removing a Redundant Power Supply CAUTION: The system requires one power supply to operate normally. On power-redundant systems, remove and replace only one power supply at a time in a system that is powered on. 1 Disconnect the power cable from the power supply. 2 Press the release latch and slide the power supply out of the chassis. See Figure 3-14. Installing System Components 103
-
 1
1 -
2
-
3
-
4
-
5
-
6
-
7
-
8
-
9
-
10
-
11
-
12
-
13
-
14
-
15
-
16
-
17
-
18
-
19
-
20
-
21
-
22
-
23
-
24
-
25
-
26
-
27
-
28
-
29
-
30
-
31
-
32
-
33
-
34
-
35
-
36
-
37
-
38
-
39
-
40
-
41
-
42
-
43
-
44
-
45
-
46
-
47
-
48
-
49
-
50
-
51
-
52
-
53
-
54
-
55
-
56
-
57
-
58
-
59
-
60
-
61
-
62
-
63
-
64
-
65
-
66
-
67
-
68
-
69
-
70
-
71
-
72
-
73
-
74
-
75
-
76
-
77
-
78
-
79
-
80
-
81
-
82
-
83
-
84
-
85
-
86
-
87
-
88
-
89
-
90
-
91
-
92
-
93
-
94
-
95
-
96
-
97
-
 98
98 -
 99
99 -
 100
100 -
 101
101 -
 102
102 -
 103
103 -
 104
104 -
 105
105 -
 106
106 -
 107
107 -
 108
108 -
109
-
110
-
111
-
112
-
113
-
114
-
115
-
116
-
117
-
118
-
119
-
120
-
121
-
122
-
123
-
124
-
125
-
126
-
127
-
128
-
129
-
130
-
131
-
132
-
133
-
134
-
135
-
136
-
137
-
138
-
139
-
140
-
141
-
142
-
143
-
144
-
145
-
146
-
147
-
148
-
149
-
150
-
151
-
152
-
153
-
154
-
155
-
156
-
157
-
158
-
159
-
160
-
161
-
162
-
163
-
164
-
165
-
166
-
167
-
168
-
169
-
170
-
171
-
172
-
173
-
174
-
175
-
176
-
177
-
178
-
179
-
180
-
181
-
182
-
183
-
184
-
185
-
186
-
187
-
188
-
189
-
190
-
191
-
192
-
193
-
194
 |
 |