Dell PowerEdge T310 Hardware Owner's Manual - Page 83
Installing the Front Bezel Insert, EMI Filler Panel, Removing an EMI Filler Panel
 |
View all Dell PowerEdge T310 manuals
Add to My Manuals
Save this manual to your list of manuals |
Page 83 highlights
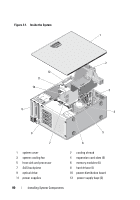
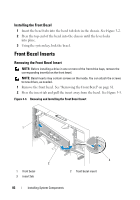
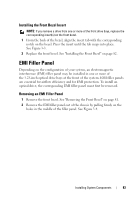
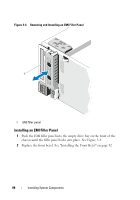
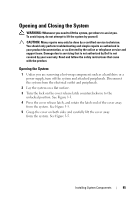
Installing the Front Bezel Insert NOTE: If you remove a drive from one or more of the front drive bays, replace the corresponding insert(s) on the front bezel. 1 From the back of the bezel, align the insert tab with the corresponding notch on the bezel. Press the insert until the tab snaps into place. See Figure 3-3. 2 Replace the front bezel. See "Installing the Front Bezel" on page 82. EMI Filler Panel Depending on the configuration of your system, an electromagnetic interference (EMI) filler panel may be installed in one or more of the 5.25-inch optical drive bays at the front of the system. EMI filler panels are essential for airflow efficiency and for EMI protection. To install an optical drive, the corresponding EMI filler panel must first be removed. Removing an EMI Filler Panel 1 Remove the front bezel. See "Removing the Front Bezel" on page 81. 2 Remove the EMI filler panel out of the chassis by pulling firmly on the holes in the middle of the filler panel. See Figure 3-4. Installing System Components 83
-
 1
1 -
2
-
3
-
4
-
5
-
6
-
7
-
8
-
9
-
10
-
11
-
12
-
13
-
14
-
15
-
16
-
17
-
18
-
19
-
20
-
21
-
22
-
23
-
24
-
25
-
26
-
27
-
28
-
29
-
30
-
31
-
32
-
33
-
34
-
35
-
36
-
37
-
38
-
39
-
40
-
41
-
42
-
43
-
44
-
45
-
46
-
47
-
48
-
49
-
50
-
51
-
52
-
53
-
54
-
55
-
56
-
57
-
58
-
59
-
60
-
61
-
62
-
63
-
64
-
65
-
66
-
67
-
68
-
69
-
70
-
71
-
72
-
73
-
74
-
75
-
76
-
77
-
 78
78 -
 79
79 -
 80
80 -
 81
81 -
 82
82 -
 83
83 -
 84
84 -
 85
85 -
 86
86 -
 87
87 -
 88
88 -
89
-
90
-
91
-
92
-
93
-
94
-
95
-
96
-
97
-
98
-
99
-
100
-
101
-
102
-
103
-
104
-
105
-
106
-
107
-
108
-
109
-
110
-
111
-
112
-
113
-
114
-
115
-
116
-
117
-
118
-
119
-
120
-
121
-
122
-
123
-
124
-
125
-
126
-
127
-
128
-
129
-
130
-
131
-
132
-
133
-
134
-
135
-
136
-
137
-
138
-
139
-
140
-
141
-
142
-
143
-
144
-
145
-
146
-
147
-
148
-
149
-
150
-
151
-
152
-
153
-
154
-
155
-
156
-
157
-
158
-
159
-
160
-
161
-
162
-
163
-
164
-
165
-
166
-
167
-
168
-
169
-
170
-
171
-
172
-
173
-
174
-
175
-
176
-
177
-
178
-
179
-
180
-
181
-
182
-
183
-
184
-
185
-
186
-
187
-
188
-
189
-
190
-
191
-
192
-
193
-
194
 |
 |