Dell PowerEdge T310 Hardware Owner's Manual - Page 115
Installing an Expansion Card, Remove the expansion card stabilizer. SeeRemoving the Expansion
 |
View all Dell PowerEdge T310 manuals
Add to My Manuals
Save this manual to your list of manuals |
Page 115 highlights
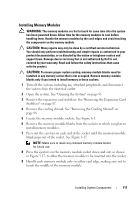
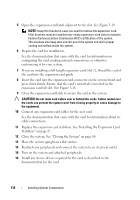
Table 3-3. Expansion-Card Installation Priority Card Priority Card Type Max 25-W Slot Priority Allowed Card? 1 PERC 6/i Adapter 1 1 Y 2 S300 Adapter 1, 2 1 Y 3 SAS 6/iR 1, 2 1 Y 4 SAS 5/iR 3, 1 1 Y 5 PERC 6/E 256 1, 2, 3 2 Y 6 PERC 6/E 512 1, 2, 3 2 Y 7 SAS 5/E 1, 2, 3 2 Y 8 All other NICs 3,1, 2 3 N* 9 Non-Dell storage cards 1 1 N* 10 Intel PRO/1000PT 1G Cu 4, 5, 3 3 N* Single Port NIC * Refer to the expansion card's documentation to determine if the maximum power exceeds 15W. Any cards that exceed 15W will be affected by the restriction of one 25W card. Installing an Expansion Card CAUTION: Many repairs may only be done by a certified service technician. You should only perform troubleshooting and simple repairs as authorized in your product documentation, or as directed by the online or telephone service and support team. Damage due to servicing that is not authorized by Dell is not covered by your warranty. Read and follow the safety instructions that came with the product. NOTE: Before installing any expansion cards, see "Expansion card installation Guidelines" 1 Turn off the system, including any attached peripherals, and disconnect the system from the electrical outlet and peripherals. 2 Open the system. See "Opening the System" on page 85. 3 Remove the expansion card stabilizer. See"Removing the Expansion Card Stabilizer" on page 87. 4 If you are installing a new card, remove the filler bracket. Installing System Components 115
-
 1
1 -
2
-
3
-
4
-
5
-
6
-
7
-
8
-
9
-
10
-
11
-
12
-
13
-
14
-
15
-
16
-
17
-
18
-
19
-
20
-
21
-
22
-
23
-
24
-
25
-
26
-
27
-
28
-
29
-
30
-
31
-
32
-
33
-
34
-
35
-
36
-
37
-
38
-
39
-
40
-
41
-
42
-
43
-
44
-
45
-
46
-
47
-
48
-
49
-
50
-
51
-
52
-
53
-
54
-
55
-
56
-
57
-
58
-
59
-
60
-
61
-
62
-
63
-
64
-
65
-
66
-
67
-
68
-
69
-
70
-
71
-
72
-
73
-
74
-
75
-
76
-
77
-
78
-
79
-
80
-
81
-
82
-
83
-
84
-
85
-
86
-
87
-
88
-
89
-
90
-
91
-
92
-
93
-
94
-
95
-
96
-
97
-
98
-
99
-
100
-
101
-
102
-
103
-
104
-
105
-
106
-
107
-
108
-
109
-
 110
110 -
 111
111 -
 112
112 -
 113
113 -
 114
114 -
 115
115 -
 116
116 -
 117
117 -
 118
118 -
 119
119 -
 120
120 -
121
-
122
-
123
-
124
-
125
-
126
-
127
-
128
-
129
-
130
-
131
-
132
-
133
-
134
-
135
-
136
-
137
-
138
-
139
-
140
-
141
-
142
-
143
-
144
-
145
-
146
-
147
-
148
-
149
-
150
-
151
-
152
-
153
-
154
-
155
-
156
-
157
-
158
-
159
-
160
-
161
-
162
-
163
-
164
-
165
-
166
-
167
-
168
-
169
-
170
-
171
-
172
-
173
-
174
-
175
-
176
-
177
-
178
-
179
-
180
-
181
-
182
-
183
-
184
-
185
-
186
-
187
-
188
-
189
-
190
-
191
-
192
-
193
-
194
 |
 |