Dell Precision Rack 7910 Dell Precision Rack 7910 Owners Manual - Page 40
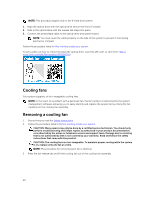
Cooling fans, Removing a cooling fan, In the event of a problem with a particular fan
 |
View all Dell Precision Rack 7910 manuals
Add to My Manuals
Save this manual to your list of manuals |
Page 40 highlights
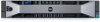
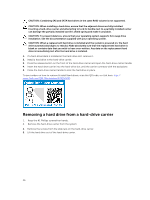
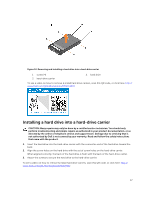
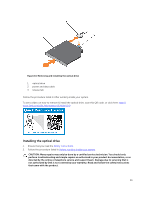
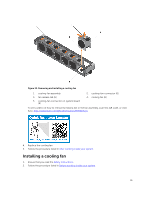
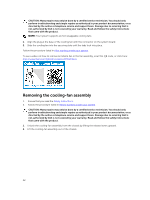
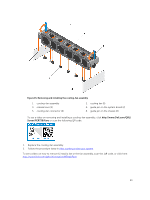
NOTE: This procedure applies only to the 8-hard drive system. 1. Align the optical drive with the optical drive slot on the front of chassis. 2. Slide in the optical drive until the release tab snaps into place. 3. Connect the power/data cable to the optical drive and system board. NOTE: You must route the cable properly on the side of the system to prevent it from being pinched or crimped. Follow the procedure listed in After working inside your system. To see a video on how to remove & install the optical drive, scan this QR code, or click here: http:// www.Dell.com/QRL/Workstation/R7910/ODD Cooling fans Your system supports six hot-swappable cooling fans. NOTE: In the event of a problem with a particular fan, the fan number is referenced by the system management software, allowing you to easily identify and replace the proper fan by noting the fan numbers on the cooling-fan assembly. Removing a cooling fan 1. Ensure that you read the Safety instructions. 2. Follow the procedure listed in Before working inside your system. CAUTION: Many repairs may only be done by a certified service technician. You should only perform troubleshooting and simple repairs as authorized in your product documentation, or as directed by the online or telephone service and support team. Damage due to servicing that is not authorized by Dell is not covered by your warranty. Read and follow the safety instructions that came with the product. CAUTION: The cooling fans are hot-swappable. To maintain proper cooling while the system is on, replace only one fan at a time. NOTE: The procedure for removing each fan is identical. 3. Press the fan release tab and lift the cooling fan out of the cooling-fan assembly. 40
-
 1
1 -
2
-
3
-
4
-
5
-
6
-
7
-
8
-
9
-
10
-
11
-
12
-
13
-
14
-
15
-
16
-
17
-
18
-
19
-
20
-
21
-
22
-
23
-
24
-
25
-
26
-
27
-
28
-
29
-
30
-
31
-
32
-
33
-
34
-
 35
35 -
 36
36 -
 37
37 -
 38
38 -
 39
39 -
 40
40 -
 41
41 -
 42
42 -
 43
43 -
 44
44 -
 45
45 -
46
-
47
-
48
-
49
-
50
-
51
-
52
-
53
-
54
-
55
-
56
-
57
-
58
-
59
-
60
-
61
-
62
-
63
-
64
-
65
-
66
-
67
-
68
-
69
-
70
-
71
-
72
-
73
-
74
-
75
-
76
-
77
-
78
-
79
-
80
-
81
-
82
-
83
-
84
-
85
-
86
-
87
-
88
-
89
-
90
-
91
-
92
-
93
-
94
-
95
-
96
-
97
-
98
-
99
-
100
-
101
-
102
-
103
-
104
-
105
-
106
-
107
-
108
-
109
-
110
-
111
-
112
-
113
-
114
-
115
-
116
-
117
-
118
-
119
-
120
-
121
-
122
-
123
-
124
-
125
-
126
-
127
-
128
-
129
-
130
-
131
-
132
-
133
-
134
-
135
-
136
-
137
-
138
-
139
-
140
-
141
-
142
 |
 |