Epson ES-300C User Manual - Page 101
Preparing for a Direct Print Operation, Scanner Settings
 |
View all Epson ES-300C manuals
Add to My Manuals
Save this manual to your list of manuals |
Page 101 highlights
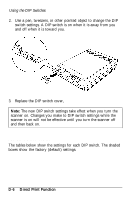
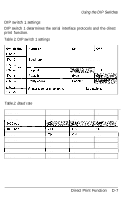
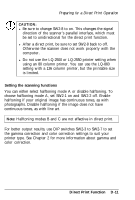
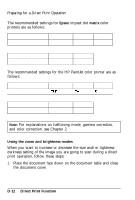
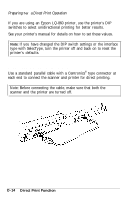
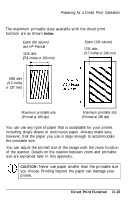
Preparing for a Direct Print Operation Before starting the direct print function, you need to make the appropriate settings on the scanner and the printer as described below, then connect them with a suitable parallel interface cable. Consult your dealer to obtain the proper parallel interface cable. Scanner Settings On the scanner, you have to set the interface direction, printer type, and scanning functions with the DIP switches. You may also want to set the zoom and brightness with the control panel buttons before you start a direct print operation. Setting the interface direction Set the DIP switch 2-8 to on when you want to use the direct print function. Setting the printer type Set DIP switches SW1-7 and SW1-8 to match the printer type you are using according to the table below. Do not set combinations other than those shown below. The LQ-2500 or LQ-2550 printer setting allows you to print the entire scanning area at the original image size. Printer type Epson LQ-860 (with color ribbon) HP PaintJet or 3630 color graphics printer Epson LQ-2500 or LQ-2550 (with color ribbon) SW1-7 OFF OFF ON SW1-8 OFF ON ON D-10 Direct Print Function
-
 1
1 -
2
-
3
-
4
-
5
-
6
-
7
-
8
-
9
-
10
-
11
-
12
-
13
-
14
-
15
-
16
-
17
-
18
-
19
-
20
-
21
-
22
-
23
-
24
-
25
-
26
-
27
-
28
-
29
-
30
-
31
-
32
-
33
-
34
-
35
-
36
-
37
-
38
-
39
-
40
-
41
-
42
-
43
-
44
-
45
-
46
-
47
-
48
-
49
-
50
-
51
-
52
-
53
-
54
-
55
-
56
-
57
-
58
-
59
-
60
-
61
-
62
-
63
-
64
-
65
-
66
-
67
-
68
-
69
-
70
-
71
-
72
-
73
-
74
-
75
-
76
-
77
-
78
-
79
-
80
-
81
-
82
-
83
-
84
-
85
-
86
-
87
-
88
-
89
-
90
-
91
-
92
-
93
-
94
-
95
-
 96
96 -
 97
97 -
 98
98 -
 99
99 -
 100
100 -
 101
101 -
 102
102 -
 103
103 -
 104
104 -
 105
105 -
 106
106 -
107
-
108
-
109
-
110
-
111
-
112
-
113
-
114
-
115
-
116
-
117
-
118
-
119
-
120
-
121
-
122
-
123
 |
 |
