Epson ES-300C User Manual - Page 22
Turning on the Scanner, Running the Self Tests, Up the Scanner
 |
View all Epson ES-300C manuals
Add to My Manuals
Save this manual to your list of manuals |
Page 22 highlights
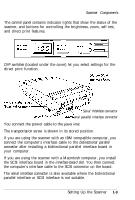
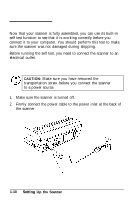
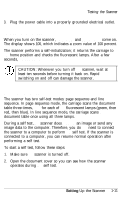
Testing the Scanner 3. Plug the power cable into a properly grounded electrical outlet. Turning on the Scanner When you turn on the scanner, the POWER and ZOOM lights come on. The display shows 100, which indicates a zoom value of 100 percent. The scanner performs a self-initialization; it returns the carriage to the home position and checks the fluorescent lamps. After a few seconds, the READY light comes on. 01. CAUTION: Whenever you turn off the scanner, wait at least ten seconds before turning it back on. Rapid switching on and off can damage the scanner. Running the Self Tests The scanner has two self-test modes: page sequence and line sequence. In page sequence mode, the carriage scans the document table three times, once for each of the fluorescent lamps (green, then red, then blue). In line sequence mode, the carriage scans the document table once using all three lamps. During a self test, the scanner does not scan an image or send any image data to the computer. Therefore, you do not need to connect the scanner to a computer to perform the self test. If the scanner is connected to a computer, you can resume normal operation after performing a self test. To start a self test, follow these steps: 1. Make sure the scanner is turned off. 2. Open the document cover so you can see how the scanner operates during the self test. Setting Up the Scanner 1-11
-
 1
1 -
2
-
3
-
4
-
5
-
6
-
7
-
8
-
9
-
10
-
11
-
12
-
13
-
14
-
15
-
16
-
 17
17 -
 18
18 -
 19
19 -
 20
20 -
 21
21 -
 22
22 -
 23
23 -
 24
24 -
 25
25 -
 26
26 -
 27
27 -
28
-
29
-
30
-
31
-
32
-
33
-
34
-
35
-
36
-
37
-
38
-
39
-
40
-
41
-
42
-
43
-
44
-
45
-
46
-
47
-
48
-
49
-
50
-
51
-
52
-
53
-
54
-
55
-
56
-
57
-
58
-
59
-
60
-
61
-
62
-
63
-
64
-
65
-
66
-
67
-
68
-
69
-
70
-
71
-
72
-
73
-
74
-
75
-
76
-
77
-
78
-
79
-
80
-
81
-
82
-
83
-
84
-
85
-
86
-
87
-
88
-
89
-
90
-
91
-
92
-
93
-
94
-
95
-
96
-
97
-
98
-
99
-
100
-
101
-
102
-
103
-
104
-
105
-
106
-
107
-
108
-
109
-
110
-
111
-
112
-
113
-
114
-
115
-
116
-
117
-
118
-
119
-
120
-
121
-
122
-
123
 |
 |