Epson ES-300C User Manual - Page 87
Connecting the Scanner to the SCSI Interface, Connecting the Scanner as a Single SCSI Device
 |
View all Epson ES-300C manuals
Add to My Manuals
Save this manual to your list of manuals |
Page 87 highlights
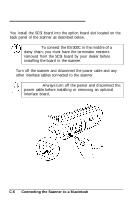
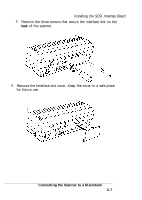
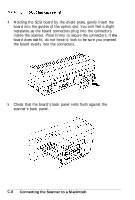
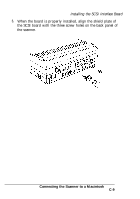
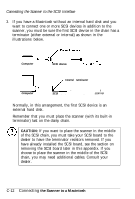
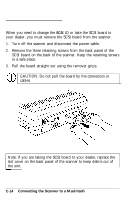
Connecting the Scanner to the SCSI Interface This section shows you how to connect the ES-300C to the SCSI interface. Consult your dealer to obtain the proper SCSI interface cable. CAUTION: If you have a Macintosh Plus, you must first set DIP switches SW1-1, SW1-2, and SW1-3 on your scanner to on. (See pages D-4 to D-7 for information on how to change DIP switch settings.) Connecting the Scanner as a Single SCSI Device The simplest connection hooks the computer directly to the scanner. To connect the scanner to the Macintosh, you need a 25-pin to 50-pin SCSI system cable. 1. Check that both the scanner and the Macintosh are turned off and unplugged from the power source. 2. Connect the 25-pin end of the cable to the SCSI port on the Macintosh. The SCSI port is the larger port with the diamondshaped icon over it. Be sure that the cable is securely connected. 3. Connect the 50-pin end of the cable to the upper connector on the SCSI board. 4. Connect the power cables on both the computer and scanner. Plug the cables into electrical outlets. 5. Always turn on the scanner first; then start the computer. CAUTION: Do not connect more than one interface cable C-10 Connecting the Scanner to a Macintosh
-
 1
1 -
2
-
3
-
4
-
5
-
6
-
7
-
8
-
9
-
10
-
11
-
12
-
13
-
14
-
15
-
16
-
17
-
18
-
19
-
20
-
21
-
22
-
23
-
24
-
25
-
26
-
27
-
28
-
29
-
30
-
31
-
32
-
33
-
34
-
35
-
36
-
37
-
38
-
39
-
40
-
41
-
42
-
43
-
44
-
45
-
46
-
47
-
48
-
49
-
50
-
51
-
52
-
53
-
54
-
55
-
56
-
57
-
58
-
59
-
60
-
61
-
62
-
63
-
64
-
65
-
66
-
67
-
68
-
69
-
70
-
71
-
72
-
73
-
74
-
75
-
76
-
77
-
78
-
79
-
80
-
81
-
 82
82 -
 83
83 -
 84
84 -
 85
85 -
 86
86 -
 87
87 -
 88
88 -
 89
89 -
 90
90 -
 91
91 -
 92
92 -
93
-
94
-
95
-
96
-
97
-
98
-
99
-
100
-
101
-
102
-
103
-
104
-
105
-
106
-
107
-
108
-
109
-
110
-
111
-
112
-
113
-
114
-
115
-
116
-
117
-
118
-
119
-
120
-
121
-
122
-
123
 |
 |