Epson R1800 User's Guide - Page 27
Orientation setting. Select, Draft, Text & Image, Photo, Best Photo, Sheet, Manual - Roll, CD/DVD - cd printing
 |
UPC - 010343853072
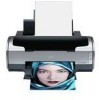
View all Epson R1800 manuals
Add to My Manuals
Save this manual to your list of manuals |
Page 27 highlights
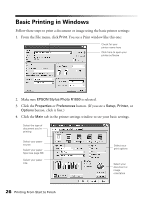
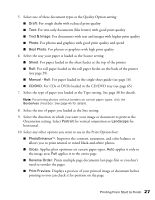
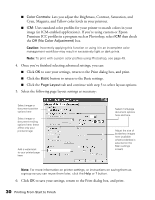
5. Select one of these document types as the Quality Option setting: ■ Draft: For rough drafts with reduced print quality ■ Text: For text-only documents (like letters) with good print quality ■ Text & Image: For documents with text and images with higher print quality ■ Photo: For photos and graphics with good print quality and speed ■ Best Photo: For photos or graphics with high print quality 6. Select the way your paper is loaded as the Source setting: ■ Sheet: For paper loaded in the sheet feeder at the top of the printer ■ Roll: For roll paper loaded in the roll paper feeder on the back of the printer (see page 39) ■ Manual - Roll: For paper loaded in the single sheet guide (see page 16) ■ CD/DVD: For CDs or DVDs loaded in the CD/DVD tray (see page 65) 7. Select the type of paper you loaded as the Type setting. See page 38 for details. Note: For printing photos without borders on certain paper types, click the Borderless checkbox. See page 45 for details. 8. Select the size of paper you loaded as the Size setting. 9. Select the direction in which you want your image or document to print as the Orientation setting. Select Portrait for vertical orientation or Landscape for horizontal. 10. Select any other options you want to use in the Print Options box: ■ PhotoEnhanceTM: Improves the contrast, saturation, and color balance or allows you to print neutral or toned black-and-white photos ■ Gloss: Applies gloss optimizer on certain paper types. Auto applies it only to the image area; Full applies it to the entire page ■ Reverse Order: Prints multiple page documents last-page-first so you don't need to reorder the pages ■ Print Preview: Displays a preview of your printed image or document before printing so you can check it for position on the page Printing From Start to Finish 27
-
 1
1 -
2
-
3
-
4
-
5
-
6
-
7
-
8
-
9
-
10
-
11
-
12
-
13
-
14
-
15
-
16
-
17
-
18
-
19
-
20
-
21
-
 22
22 -
 23
23 -
 24
24 -
 25
25 -
 26
26 -
 27
27 -
 28
28 -
 29
29 -
 30
30 -
 31
31 -
 32
32 -
33
-
34
-
35
-
36
-
37
-
38
-
39
-
40
-
41
-
42
-
43
-
44
-
45
-
46
-
47
-
48
-
49
-
50
-
51
-
52
-
53
-
54
-
55
-
56
-
57
-
58
-
59
-
60
-
61
-
62
-
63
-
64
-
65
-
66
-
67
-
68
-
69
-
70
-
71
-
72
-
73
-
74
-
75
-
76
-
77
-
78
-
79
-
80
-
81
-
82
-
83
-
84
-
85
-
86
-
87
-
88
-
89
-
90
-
91
-
92
-
93
-
94
-
95
-
96
-
97
-
98
-
99
-
100
-
101
-
102
-
103
-
104
-
105
-
106
-
107
-
108
-
109
-
110
-
111
-
112
-
113
-
114
-
115
-
116
 |
 |
