Epson R1800 User's Guide - Page 60
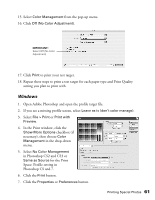
pop-up menu., Select the Media Type setting for the profile you're printing. - printer profiles
 |
UPC - 010343853072
View all Epson R1800 manuals
Add to My Manuals
Save this manual to your list of manuals |
Page 60 highlights
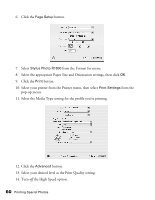
6. Click the Page Setup button. 7. Select Stylus Photo R1800 from the Format for menu. 8. Select the appropriate Paper Size and Orientation settings, then click OK. 9. Click the Print button. 10. Select your printer from the Printer menu, then select Print Settings from the pop-up menu. 11. Select the Media Type setting for the profile you're printing. 12. Click the Advanced button. 13. Select your desired level as the Print Quality setting. 14. Turn off the High Speed option. 60 Printing Special Photos
-
 1
1 -
2
-
3
-
4
-
5
-
6
-
7
-
8
-
9
-
10
-
11
-
12
-
13
-
14
-
15
-
16
-
17
-
18
-
19
-
20
-
21
-
22
-
23
-
24
-
25
-
26
-
27
-
28
-
29
-
30
-
31
-
32
-
33
-
34
-
35
-
36
-
37
-
38
-
39
-
40
-
41
-
42
-
43
-
44
-
45
-
46
-
47
-
48
-
49
-
50
-
51
-
52
-
53
-
54
-
 55
55 -
 56
56 -
 57
57 -
 58
58 -
 59
59 -
 60
60 -
 61
61 -
 62
62 -
 63
63 -
 64
64 -
 65
65 -
66
-
67
-
68
-
69
-
70
-
71
-
72
-
73
-
74
-
75
-
76
-
77
-
78
-
79
-
80
-
81
-
82
-
83
-
84
-
85
-
86
-
87
-
88
-
89
-
90
-
91
-
92
-
93
-
94
-
95
-
96
-
97
-
98
-
99
-
100
-
101
-
102
-
103
-
104
-
105
-
106
-
107
-
108
-
109
-
110
-
111
-
112
-
113
-
114
-
115
-
116
 |
 |

60
Printing Special Photos
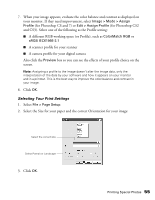
6.
Click the
Page Setup
button.
7.
Select
Stylus Photo R1800
from the Format for menu.
8.
Select the appropriate Paper Size and Orientation settings, then click
OK
.
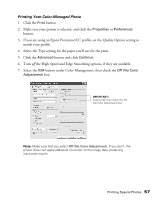
9.
Click the
Print
button.
10. Select your printer from the Printer menu, then select
Print Settings
from the
pop-up menu.
11. Select the Media Type setting for the profile you’re printing.
12. Click the
Advanced
button.
13. Select your desired level as the Print Quality setting.
14. Turn
off
the High Speed option.