Epson R1800 User's Guide - Page 75
Running the Head Cleaning Utility - print head
 |
UPC - 010343853072
View all Epson R1800 manuals
Add to My Manuals
Save this manual to your list of manuals |
Page 75 highlights
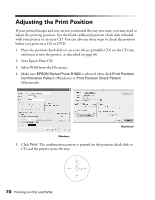
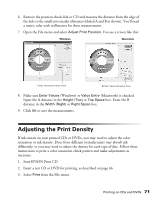
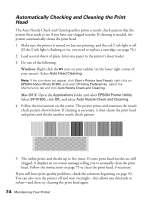
Running the Head Cleaning Utility 1. Make sure the printer is turned on but not printing, and the red H ink light is off. (If the H ink light is flashing or on, you need to replace a cartridge; see page 76.) 2. Do one of the following: Windows: Right-click the icon on your taskbar (in the lower right corner of your screen). Select Head Cleaning. Note: If the icon does not appear, click Start > Printer (and Faxes), right-click on EPSON Stylus Photo R1800, and select Printing Preferences. Select the Maintenance tab and click Head Cleaning. Mac OS X: Open the Applications folder and select EPSON Printer Utility. Select SP R1800, click OK, and select Head Cleaning. 3. Follow the instructions on the screen to clean the print head. Cleaning takes about two minutes, during which the printer makes noise and the green P power light flashes. Caution: Never turn off the printer while the green P power light is flashing, unless the printer hasn't moved or made noise for more than 5 minutes. 4. When the green P power light stops flashing, make sure paper is loaded in the printer. Click Print nozzle check pattern, then click Print (Windows) or click Confirmation, then click Next (Macintosh). The nozzle check pattern prints. 5. If the nozzle check pattern has no gaps or lines (as shown below), click Finish. Maintaining Your Printer 75
-
 1
1 -
2
-
3
-
4
-
5
-
6
-
7
-
8
-
9
-
10
-
11
-
12
-
13
-
14
-
15
-
16
-
17
-
18
-
19
-
20
-
21
-
22
-
23
-
24
-
25
-
26
-
27
-
28
-
29
-
30
-
31
-
32
-
33
-
34
-
35
-
36
-
37
-
38
-
39
-
40
-
41
-
42
-
43
-
44
-
45
-
46
-
47
-
48
-
49
-
50
-
51
-
52
-
53
-
54
-
55
-
56
-
57
-
58
-
59
-
60
-
61
-
62
-
63
-
64
-
65
-
66
-
67
-
68
-
69
-
 70
70 -
 71
71 -
 72
72 -
 73
73 -
 74
74 -
 75
75 -
 76
76 -
 77
77 -
 78
78 -
 79
79 -
 80
80 -
81
-
82
-
83
-
84
-
85
-
86
-
87
-
88
-
89
-
90
-
91
-
92
-
93
-
94
-
95
-
96
-
97
-
98
-
99
-
100
-
101
-
102
-
103
-
104
-
105
-
106
-
107
-
108
-
109
-
110
-
111
-
112
-
113
-
114
-
115
-
116
 |
 |
